Part 1 – Basic Operations covers configuring a new webERP company, creating items, basic purchasing and selling, introduces accounting, financial reporting and period closing, and ends with an introduction to human resources.
Continue reading “Part 1 – Basic Operations”Chapter 1 – Getting Started
webERP is powerful open source business software. In this chapter we will learn how to use the webERP user interface. Topics we will cover include:
- How to login to webERP
- The webERP User Interface
Cloud or web applications have become popular for a number of reasons, but primarily because internet access has become now ubiquitous and using a web browser to interact with the cloud software avoids users having to install and maintain software themselves.
Supported Web Browsers
All mainstream web browsers can be used with webERP, including:
- Google Chrome
- Microsoft Edge
- Apple Safari
- Mozilla Firefox
TIP You may find viewing reports generated by webERP more convenient if you configure your web browser to display PDF-format files instead of downloading them (you may also need to configure your operating system to use your browser as the default PDF viewer).
Login to webERP
Open your web browser, type the web site address (the URL) provided by your webERP service provider into the address box and press [Return].
Select the company name and enter the administrator user name and password from your webERP services provider and click [Login].
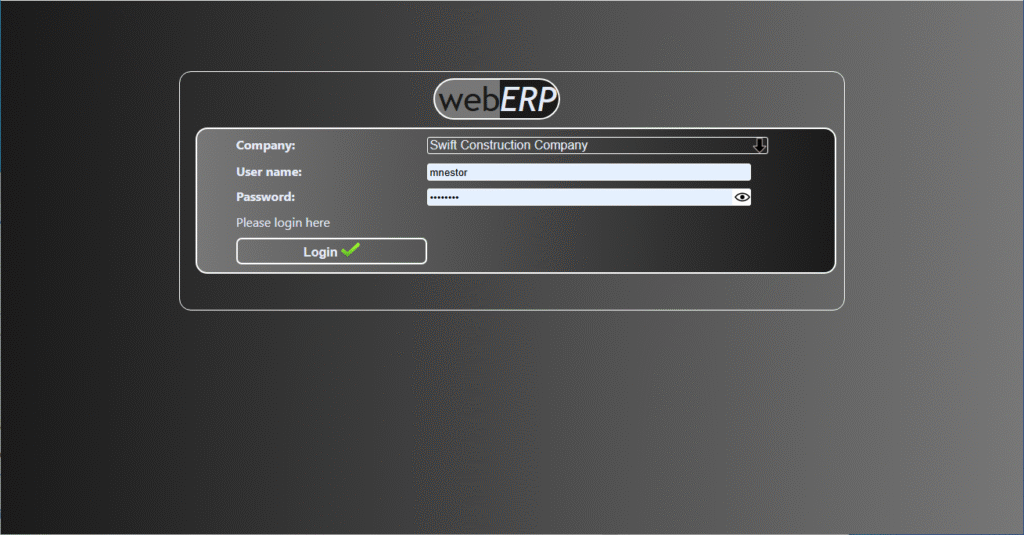
After logging in, the webERP desktop will appear.
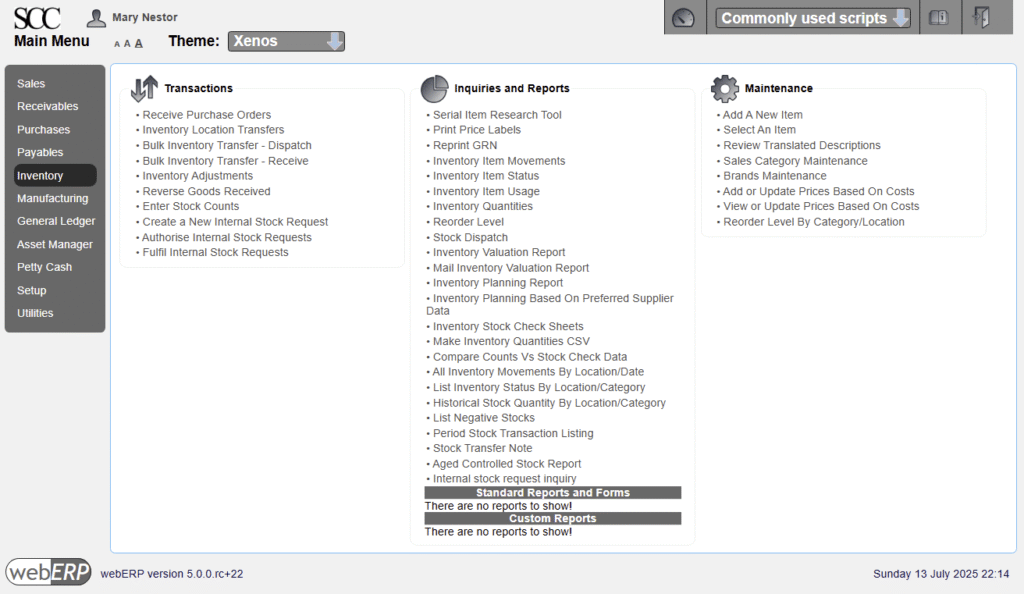
webERP User Interface
The webERP user interface is based on a main menu (left) with sub-menu items in three columns (Transactions, Inquiries and Reports and Maintenance) which vary based on the selected main-menu item.
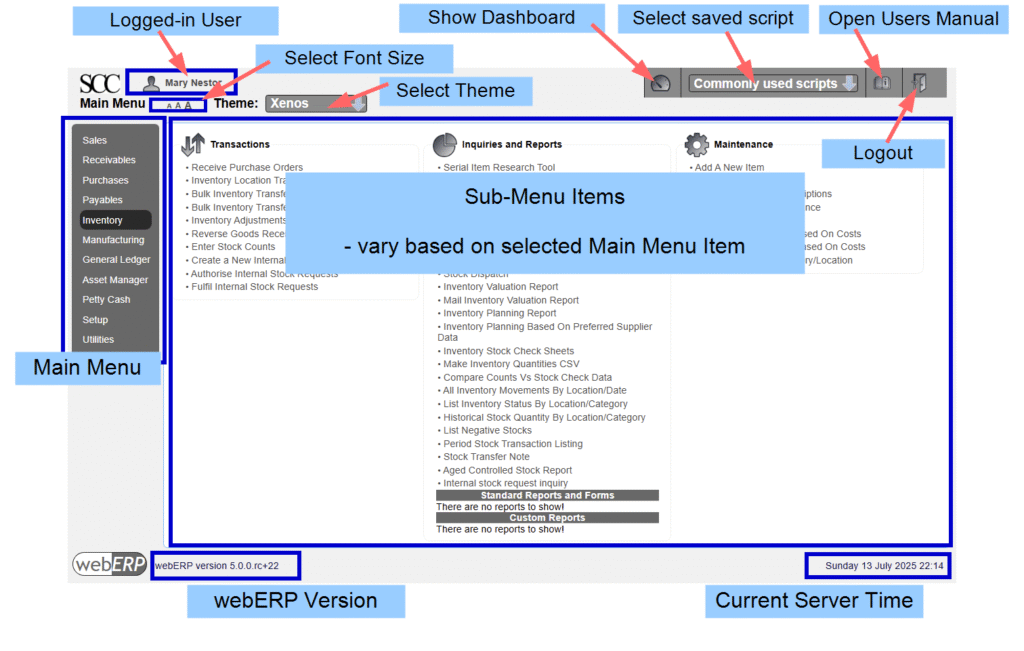
User Interface (UI) Definitions
The following terms relate to aspects of the webERP User Interface (UI).
- Field. A numeric or text element on the page that you can enter data into.
- Popup. A window which appears (“pops up”) in front of the main window. The webERP User Manual appears in a popup when viewing sub-menu pages, otherwise it opens in a new browser tab.
- Script. A code file that is run (executed) by clicking a menu item.
- Record. A single row in a database table. webERP stores data in many tables, each of which is not unlike a spreadsheet with columns (fields) and rows (records).
- Tabs. Tabs are a method to group sets of related content, click a tab to show a particular sub-set.
- Page. A web site is made up of pages which present information and provide clickable links to perform actions. webERP is made up of scripts that are run by clicking a sub-menu item link from the menu.
- Widget. A widget is an element that can be added to the webERP dashboard.
Copy & Paste
You will find yourself often copying data from various sources and paste it into webERP. Be careful when copying data that hidden characters are not included at the start or end of the copied tex, which will cause data to sort odly and present unexpectedly.
If this happens, you can check for hidden characters at the start or end of a field by accessing the field and positioning the cursor in the text, then use the [HOME], [RIGHT-ARROW], [END], [LEFT-ARROW] keys to move the cursor to first the beginning of the text and then the end of the text, and check if the cursor appropriately. If the cursor does not appear to move when expected, a hidden character is likely present which can then be deleted by pressing the [BACKSPACE] or [DELETE] key as appropriate.
Summary
In this chapter we saw how easy it was to login to webERP and explore the user interface.
In the next chapter, we will start using webERP.
Chapter 2 – Configure Company
In this chapter we will configure a new webERP site for use by a company.
We will also configure a Knowledge Base for storing notes and documents related to Items, Suppliers and Customers (configuring and using a Knowledge Base is optional).
Goal
- Configure webERP to use by the Swift Construction Company (SCC).
The SCC is a manufacturing company located in Calgary, Alberta, Canada. It operates in Canadian funds and has domestic and international suppliers and customers.
Procedure
We will first login to our new webERP site using the admin user credentials provided by our webERP services provider or systems administrator (they credentials were entered when the webERP site was installed on the server).
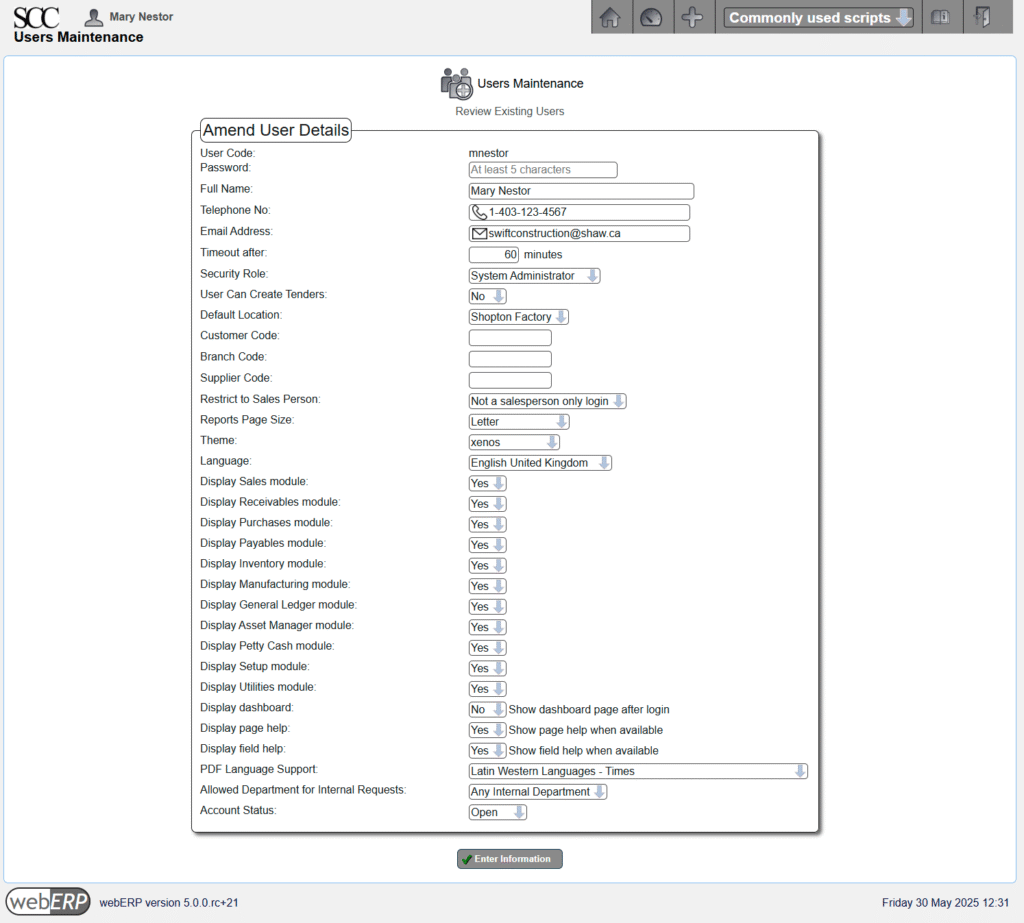
Next, we will immediate create a login ID for our super-user aka power-user. For the SCC, that will be Mary Nestor, Director of MIS/IT, who will be assigned the System Administrator security role
Access [Main Menu > Setup > General Setup Options > Users Maintenance]
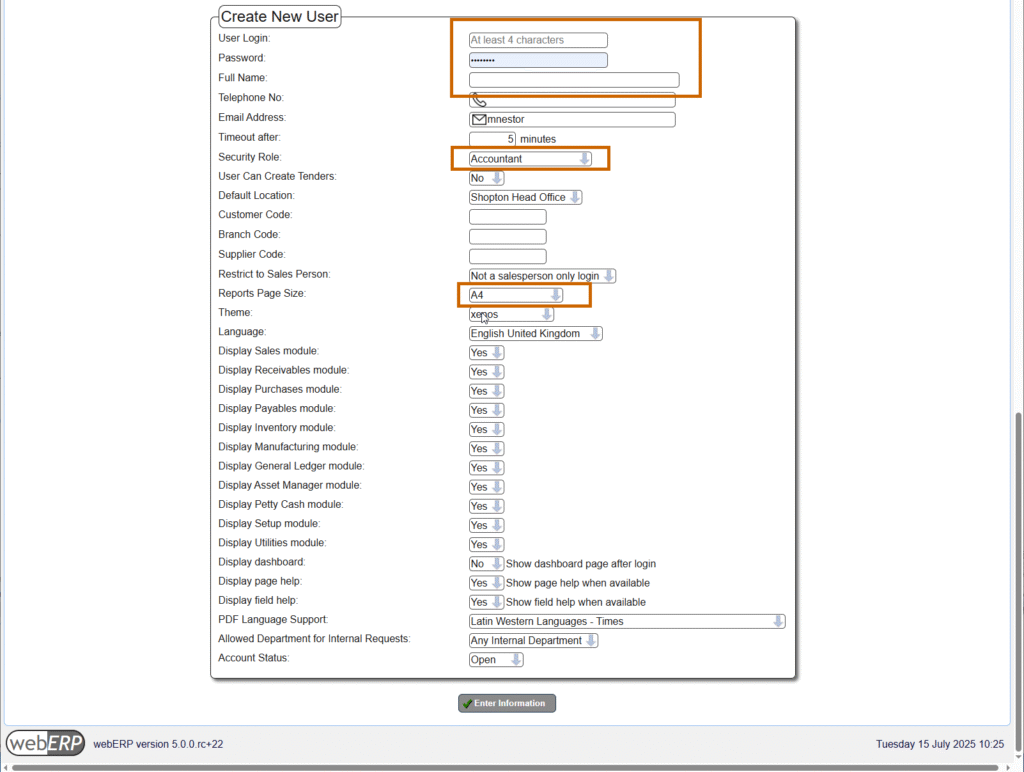
and enter the necessary information to create a user id for Mary Nestor.
- User Code: mnestor
- Password: secret
- Full Name: Mary Nestor
- e-mail address: mnestor@swiftconstruction.com
- Security Role: System Administrator
- Location: anything (we will change this shortly after creating a location for the SCC).
- Report Page Size: letter
In actual use, it is important that each user has their own login with a password only they know. This allows who performed a transaction or operation to be identified after the fact for tracibility and can be especially important in regulated industries.
The default or out-of-the-box security permissions can generally be used to get started. You should plan though to eventually create bespoke security roles and security token assignments based on your business’s unique needs which you will find easier to understand and maintain over time.
Be the Super-User
Logout and back in as the super-user we just created (mnestor).
You may wish to deactive the original adminstrator user to close a potential security vulnerability, or intentionally leave it active as a backup way in. However, you cannot delete the original administrator because there are entries associated with it in the system audit log.
Location
We will create a new location code “SHOPT” (Shopton) for the SCC office and warehouse.
[Main Menu > Setup > Inventory Setup > Inventory Locations Maintenance]
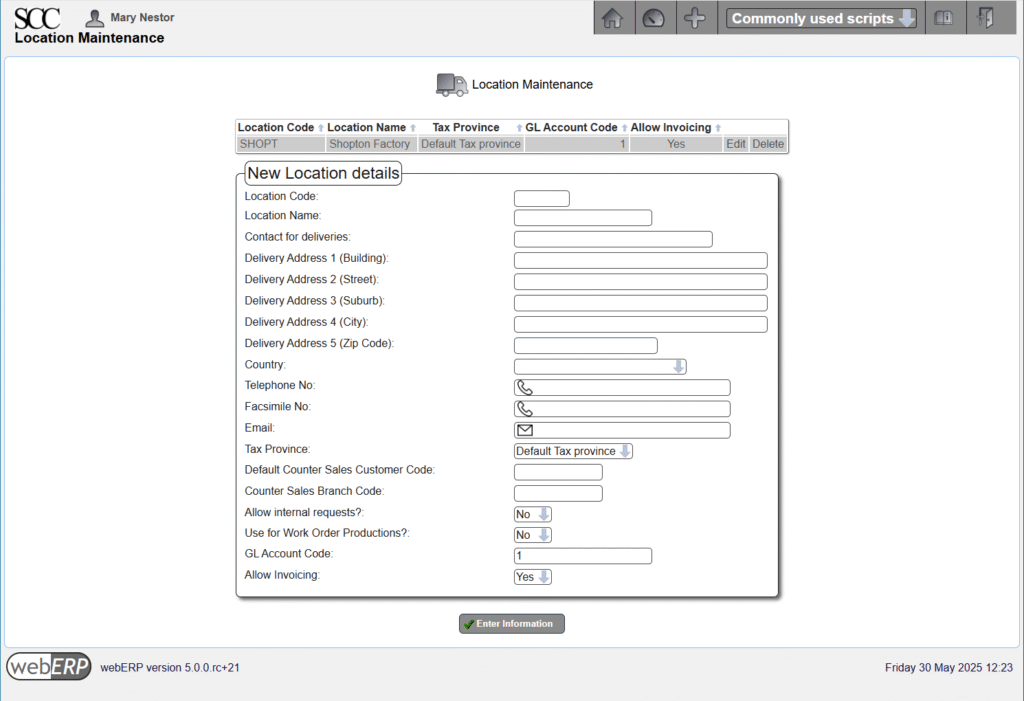
Delivery Address 1 must be given a value as there are other scripts depending on it (e.g. without Delivery Address 1, attempting to create a purchase order will result in a “missing delivery address” error).
After creating the new location, change the location of the administration user to the new location (and also change the location of any other users you may have created).
Currencies
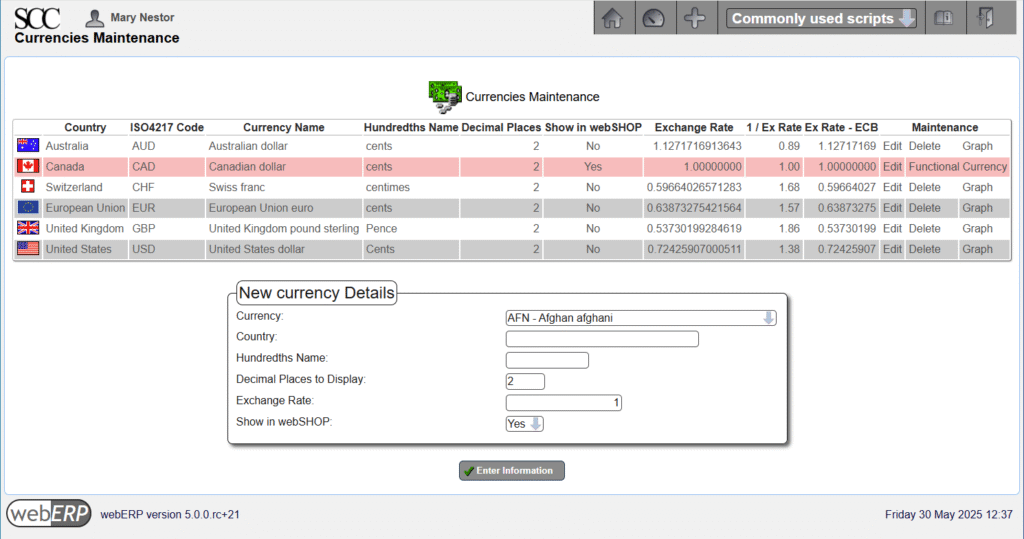
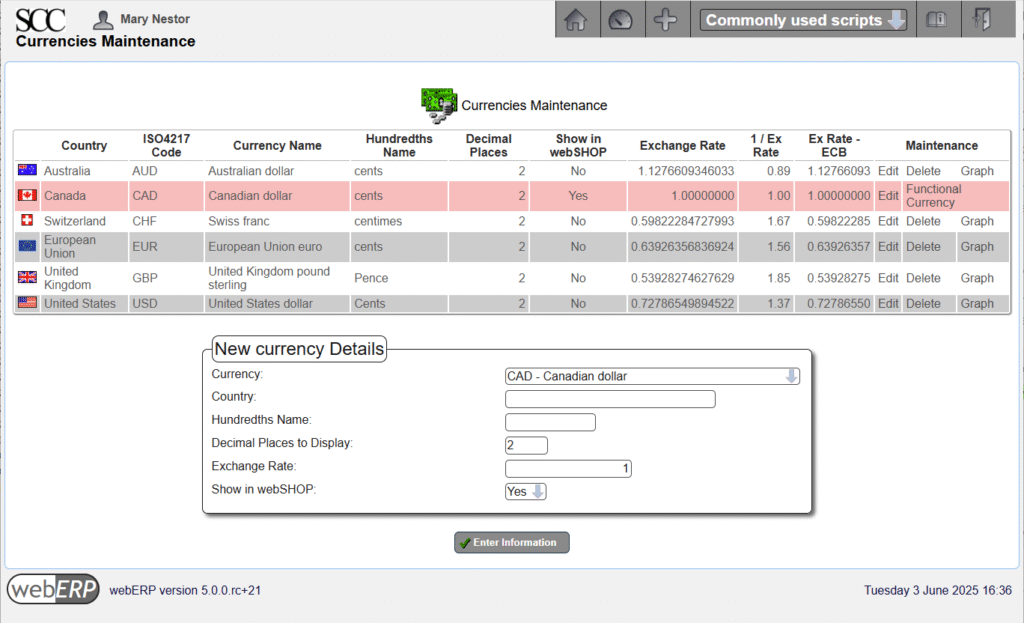
We will need to create a CAD currency for the SCC as it operates in Canadian dollars.
“CAD” is called the “Functional Currency” because it is the currency the Swift Construction Company operates in.
[Main Menu > Setup > General Setup > Currency Maintenance]
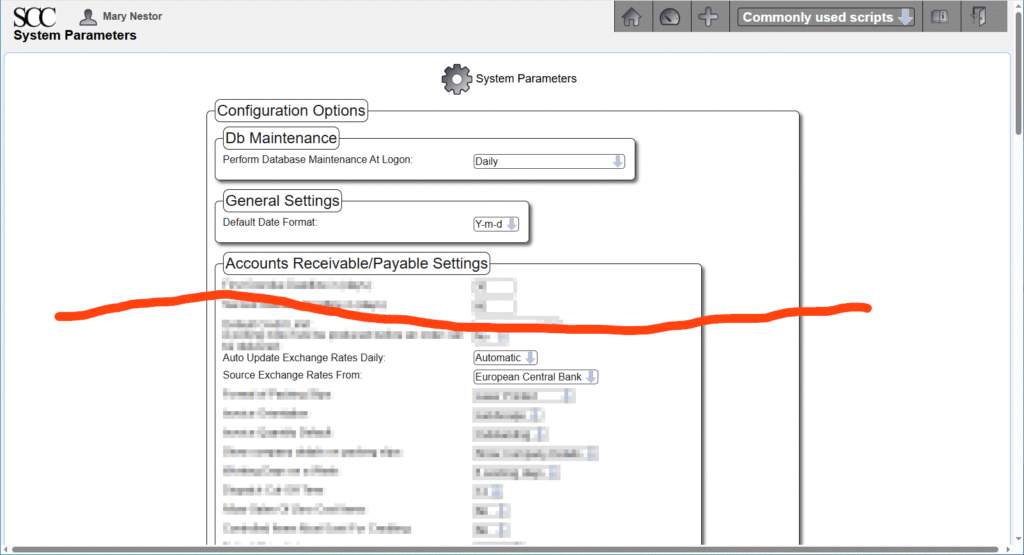
We will also configure webERP to obtain updated currency exchange rates daily from the European Central Bank.
[Main Menu > Setup > General Setup > System Parameters]
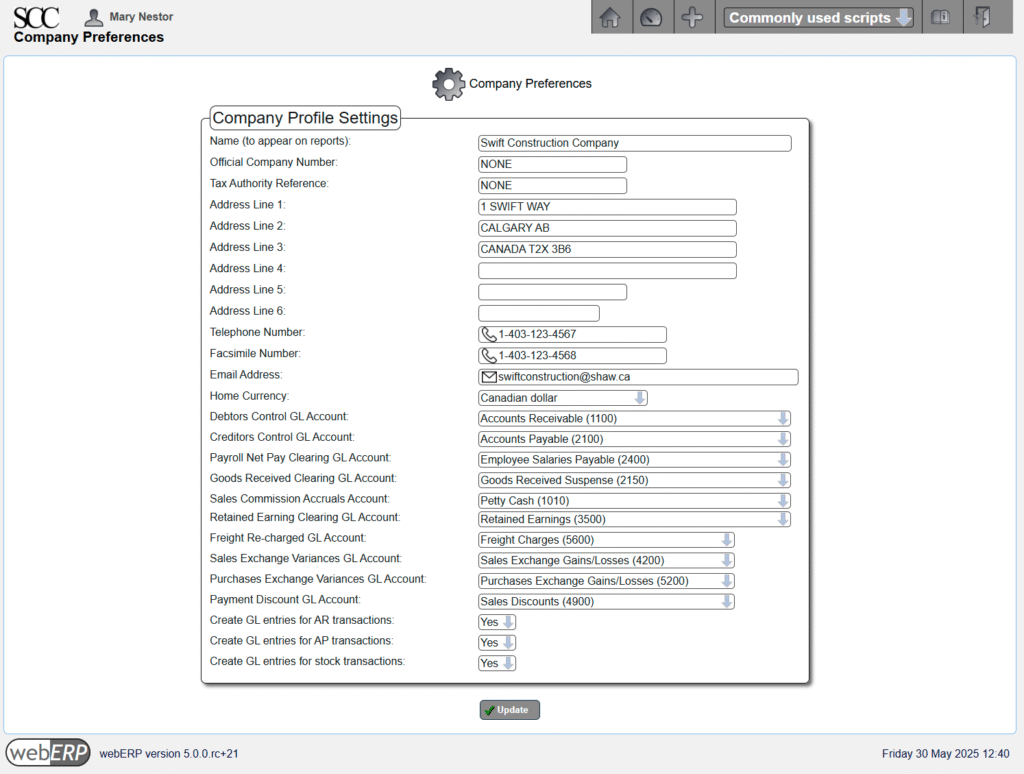
Company Preferences
Operating practices for a specific company are configured in the Company Preferences screen (webERP supports multiple companies and the desired company is selected at login).
[MainMenu > Setup > General > Company Preferences]
System Parameters
General system-wide behavior is configured in the System Preferences screen.
[Main Menu > Setup > General > System Parameters]
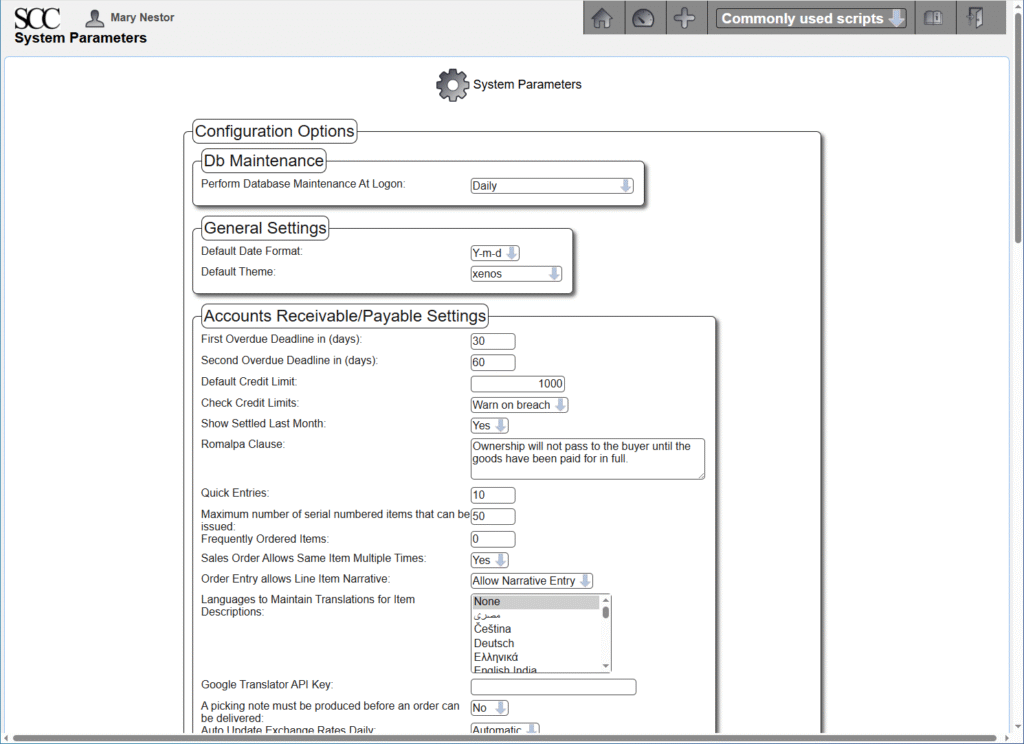
Some of the less obvious parameters will be described here.
- Db Maintenance: Daily
- The “OPTIMIZE DATABASE” query runs daily when the first admin user logs in. Setting this to ‘Allow ‘SysAdmin Access Only” prevents normal users from logging in which can be useful when performing maintenance but users already logged in are not affected (will need to work with your server system administrator if for some reason you require that no users can be logged in except yourself).
.
- The “OPTIMIZE DATABASE” query runs daily when the first admin user logs in. Setting this to ‘Allow ‘SysAdmin Access Only” prevents normal users from logging in which can be useful when performing maintenance but users already logged in are not affected (will need to work with your server system administrator if for some reason you require that no users can be logged in except yourself).
- Date format: Y-m-d.
- Unless you have a compelling reason not to, select Y-m-d for clarity over familiarity (is 2017-03-08 March 8, 2017, or August 3rd?). You’ll also be conforming to ISO 8601.
.
- Unless you have a compelling reason not to, select Y-m-d for clarity over familiarity (is 2017-03-08 March 8, 2017, or August 3rd?). You’ll also be conforming to ISO 8601.
- Frequently Ordered Items: 0.
- Used by the webERP web shop (if installed).
.
- Used by the webERP web shop (if installed).
- Sales Order Allows Same Item Multiple Times: Yes
- In general, start by not blocking user behavior and disable later if you determine users are creating issues.
.
- In general, start by not blocking user behavior and disable later if you determine users are creating issues.
- Languages to Maintain Translations for Item Descriptions: None
- Don’t complicate things initially.
.
- Don’t complicate things initially.
- Picking note must be produced before an order can be delivered: No
- Again, don’t complicate the process to start with.
.
- Again, don’t complicate the process to start with.
- Auto Update Exchange Rates Daily: Automatic
- Source exchange rates from the European Central Bank.
.
- Source exchange rates from the European Central Bank.
- Create Debtor Codes Automatically: No
- I will use my own mnemonic codes (a sequential integer will be assigned if set to Yes).
.
- I will use my own mnemonic codes (a sequential integer will be assigned if set to Yes).
- Create Supplier Codes Automatically: No
- I will use my own mnemonic codes (a sequential integer will be assigned if set to Yes).
.
- I will use my own mnemonic codes (a sequential integer will be assigned if set to Yes).
- Country of operation: Canada
- Used when calculating shipping costs.
.
- Used when calculating shipping costs.
- Purchase Order Allows Same Item Multiple Times: Yes
- In general, start by not blocking user behavior and disable later if you determine users are creating issues.
.
- In general, start by not blocking user behavior and disable later if you determine users are creating issues.
- Automatically authorise purchase orders if user has authority: Yes.
- Will disable later if issues arise.
.
- Will disable later if issues arise.
- Financial year ends on: December
- A common end month.
.
- A common end month.
- Maximum Size in KB of uploaded images: 3000 (default)
- The default value is arguably small for typical images today and images may need to be reduced in resolution before uploading. However, increasing the size to allow high-resolution images (10MB?) is not necessarily a good solution either it will slow down showing item searches because of the increased time it will take to load the larger images.
.
- The default value is arguably small for typical images today and images may need to be reduced in resolution before uploading. However, increasing the size to allow high-resolution images (10MB?) is not necessarily a good solution either it will slow down showing item searches because of the increased time it will take to load the larger images.
- Directory to store images: part_pics
- The standard directory name used in a default installation.
.
- The standard directory name used in a default installation.
- Directory to store reports: reports
- The standard directory name used in a default webERP installation.
.
- The standard directory name used in a default webERP installation.
- Wiki application: WackoWiki
- A “Wiki” is a simple content management system that can be integrated with webERP to build a Knowledge Base. A link to the Knowledge Base will be appear in the Items, Suppliers and Customer pages if a Wiki has been configured. Supporting notes and documents can be stored in the Knowledge Base for access by others.
.
- A “Wiki” is a simple content management system that can be integrated with webERP to build a Knowledge Base. A link to the Knowledge Base will be appear in the Items, Suppliers and Customer pages if a Wiki has been configured. Supporting notes and documents can be stored in the Knowledge Base for access by others.
- Inventory Costing Method: Standard
- webERP allows inventory to be costed based on either the weighted average of items in stock or uses the standard cost for an item and reports price variances, which determines the general ledger postings resulting from purchase invoices and shipment closing. Select Standard unless you have a good reason to use averaged.
.
- webERP allows inventory to be costed based on either the weighted average of items in stock or uses the standard cost for an item and reports price variances, which determines the general ledger postings resulting from purchase invoices and shipment closing. Select Standard unless you have a good reason to use averaged.
- Auto issue components: Yes
- Automatically decrement items from stock according to the BOM for an Item when it is manufactured to reduce admin effort.
.
- Automatically decrement items from stock according to the BOM for an Item when it is manufactured to reduce admin effort.
- Prohibit Negative Stock: No
- Keep operations non-blocking but this may be safe to assume and will enable later. I don’t know how this is implemented or if it has an effect on system performance.
.
- Keep operations non-blocking but this may be safe to assume and will enable later. I don’t know how this is implemented or if it has an effect on system performance.
- Log Severity Level: All
- In general, it is good to see all log entries initially for familarity and reduce later as you more familiar with system. You will need system user access to the server to vew the log files(“Path to log files” is provided by your system administrator).
.
- In general, it is good to see all log entries initially for familarity and reduce later as you more familiar with system. You will need system user access to the server to vew the log files(“Path to log files” is provided by your system administrator).
- Controlled Items Defined At Work Order Entry: Yes
- When set to yes, controlled items (items with individual or batch/lot identification) are defined when a work oeswe at the time of the work order creation (otherwise controlled items ) are entered at the time the finished items are received against the work order.
.
- When set to yes, controlled items (items with individual or batch/lot identification) are defined when a work oeswe at the time of the work order creation (otherwise controlled items ) are entered at the time the finished items are received against the work order.
- Auto Create Work Orders: Yes
- This causes work orders to be automatically created for the default factory location if a sales order is entered and cannot be satisfied by the current inventory quantity.
.
- This causes work orders to be automatically created for the default factory location if a sales order is entered and cannot be satisfied by the current inventory quantity.
- Default Factory Location: Shopton Head Office
- The location used by automatically created work orders.
.
- The location used by automatically created work orders.
- Factory, Purchasing and Inventory Manager email addresses: your email address
- Use your own email address to become familar with the notices while you are learning about webERP. You can forward the notices to more specific managers if needed and eventually change the email addresses so the notices are sent directly (and don’t clutter your inbox).
.
Create an email group alias on your mail server to use if you want notices sent directly to more than one person.
.
- Use your own email address to become familar with the notices while you are learning about webERP. You can forward the notices to more specific managers if needed and eventually change the email addresses so the notices are sent directly (and don’t clutter your inbox).
- Using Smtp Mail: Yes
- webERP will send email using either the server’s default email configuration or by relaying using a seperate SMTP server. If you do not have direct control over the server, relaying using an SMTP server is recommended as the most reliable method.
.
You will need to enter credentials provided by your email service provider in [Main Menu > Setup > General Setup Options > SMTP Server Details]
.
- webERP will send email using either the server’s default email configuration or by relaying using a seperate SMTP server. If you do not have direct control over the server, relaying using an SMTP server is recommended as the most reliable method.
Summary
This completes basic webERP configuration. Additional configuration may be required, for example to configure bank accounts in order to purchase items, which will be presented at the time.
Chapter 3 – Items and Bills of Materials
In webERP and many other ERP systems, an Item is a fundamental concept that represents any tangible product, intangible service, or component that a business buys, sells, manufactures, stores, or uses in its operations. An Item can also be produced from other Items, a list of those items is called a Bill of Materials.
In this chapter, we will first explore the theory of Items and then use webERP to create Items and a Bill of Materials.
Chapter 3.1 – Theory
Goals
- Learn terminology and theory related to items and change management.
Chapter 3.2 – Practice
Goals
- Create items and a bill of materials to model an assembly.
- Enter supplier information for purchasing.
- Store original manufacturer product documents (optional).
Chapter 4 – Purchasing
This chapter is a work in progress.
Implementing an Enterprise Resource Planning (ERP) system for purchasing in a small company offers significant advantages, primarily by centralizing and streamlining the procurement process. This centralization eliminates manual tasks and reduces errors, leading to improved accuracy in orders and inventory management. Furthermore, an ERP system enhances visibility into spending and supplier performance, enabling better negotiation power and cost savings. It also facilitates automation of routine tasks like purchase order generation and invoice processing, freeing up staff for more strategic activities. Ultimately, an ERP system empowers small companies to optimize their purchasing operations, reduce costs, and make more informed decisions.
A manufacturing enterprise purchases raw material, converts the raw material to finished goods and services, and sells the finished goods and services to customers. In this chapter we will purchase the items on a Bill of Materials one by one.
Purchasing can be automatically based on demand (sales order, manufacturing order or forecast). For more information see Section 2, Chapter 10 – Advanced purchasing.
Features of using webERP for purchasing include:
- Efficiency. Items, Vendors, Purchase Orders, etc. are managed within one controlled system. Fix a problem once and it’s fixed everywhere.
- Visibility. Purchases must be approved before printing and payment must be approved before being issued.
- Scalable. Readily scales with users, items, vendors and orders, and adapts as your processes change over time.
The custom inductor in the Swift Construction Company’s Aircraft Wireless product will be used as an example. Related documentation will be stored in the Knowledge Base (optional).
Goals
- Issue purchase orders to a vendor.
- Receive goods into inventory.
- Create a vendor invoice and pay the vendor.
Purchasing Terminology
- A Vendor is a party who sells goods or services, other names often used are Supplier and Source.
- A Purchase Order is a request to purchase an item sent from the intended purchaser to a vendor. If the vendor accepts the purchase order, it becomes a legally binding contract.
Procure to Pay (P2P) Process
The complete purchasing and payment process cycle is commonly called Procure to Pay, or P2P.
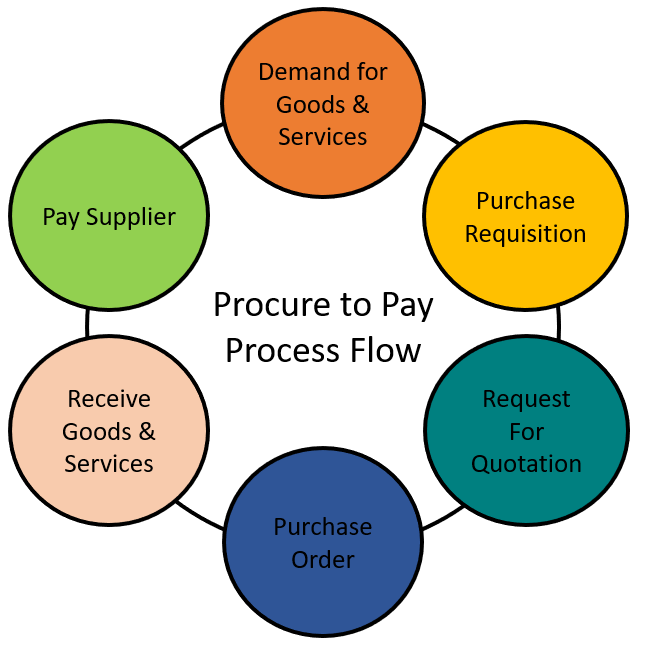
TODO re-generate image as original art with steps named per webERP convention and in style of O2C flowchart (see Sell with webERP)
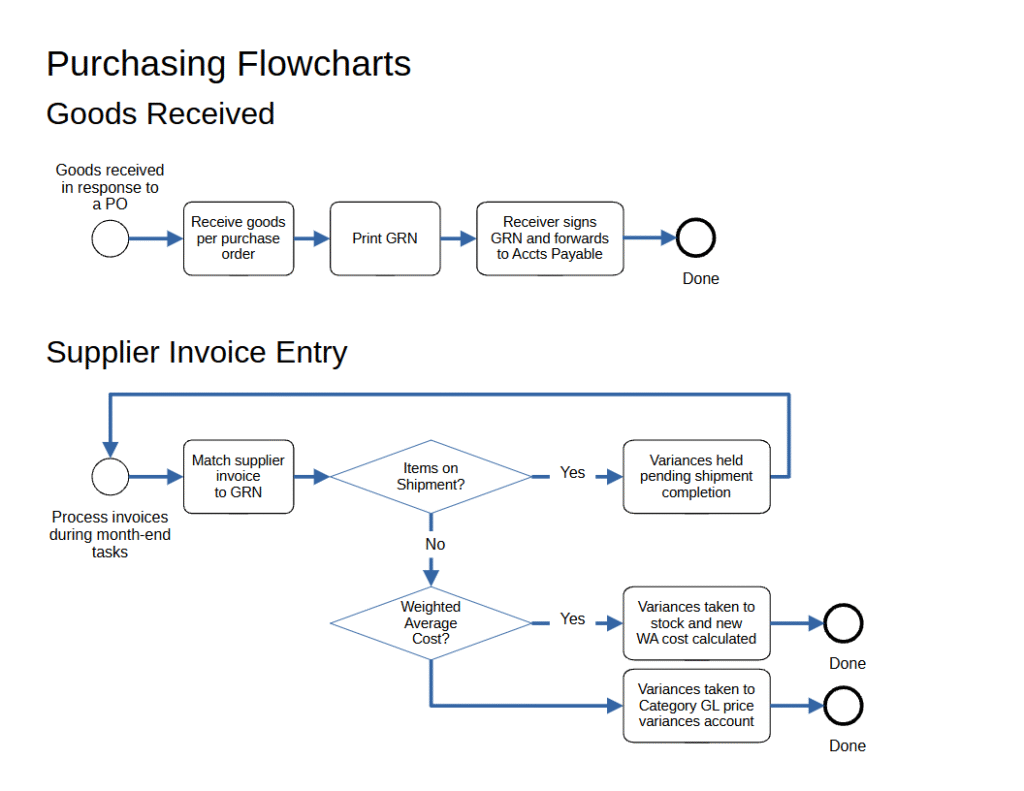
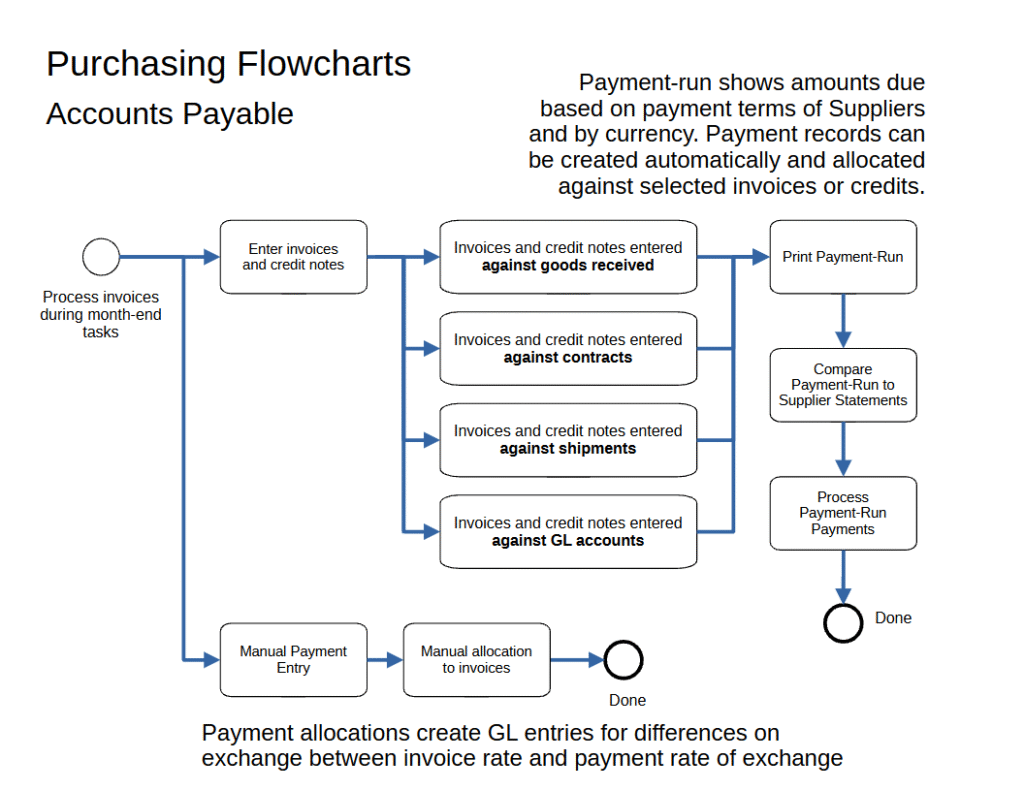
Purchasing Flowcharts
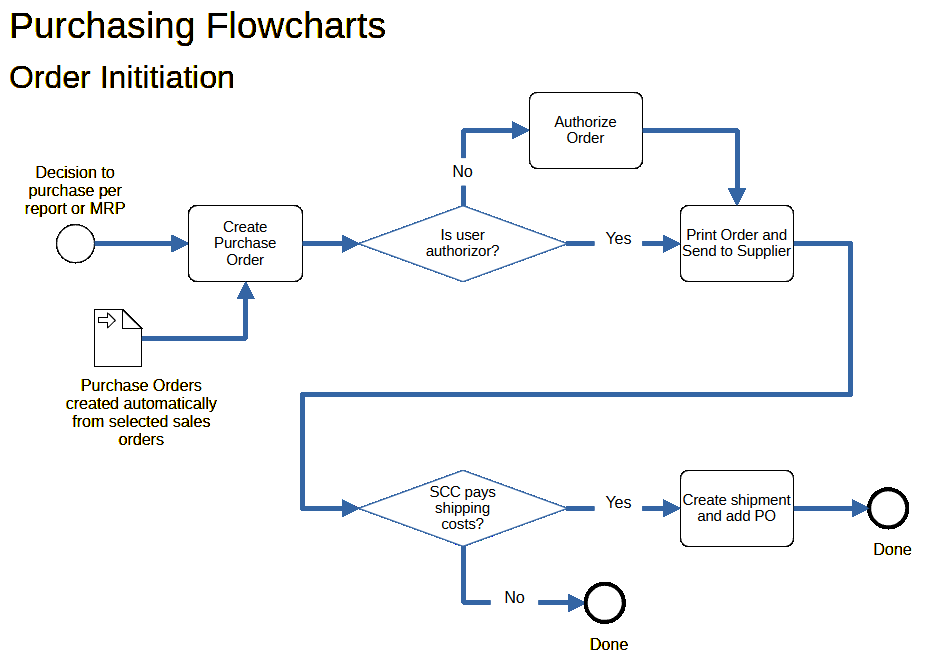
The general purchaing process in webERP is as follows:
- Step 1. Create, print and send a purchase order to a vendor. The order will be approved and can be printed if the creator has authorization permission, otherwise it will be queued for authorization by someone who does have authorization. “Printing” is a euphemism for issuing the order to the vendor, and an order must be printed before stock can be received against it.
- Step 2. Receive stock against purchase order.
- Step 3. Print a Goods Received Note and submit to the Accounts Payable department for matching to the vendor invoice.
- Step 4. Print and attach QA labels to the received goods.
- Step 5. Pay Vendor. Payment is often made after goods are received according to the purchase terms (e.g. “30 day”) although other terms, such as prepayment and cash on delivery (COD), are also common. To pay a supplier, a supplier vendor invoice must be created and matched to the order and to the a goods receipt note (GNR).
User Permissions
We will login as user “mnestor” (Mary Nestor), who is assigned the Administrator security role and has permission for almost all operations. If a user with a different security role is needed it will be noted.
In actual use, it is important that each user has their own login with a password only they know. This allows who performed a transaction or operation to be identified after the fact for tracibility and can be especially important in regulated industries.
The default (out-of-the-box) user permissions and security configuration will generally be sufficient to get you started. Eventually though you will want to create bespoke security roles and token assignments based on the structure, staff and relationships of your company.
For more information on User Permissions, see Section 2, Chapter 8 – User Permissions.
Setup
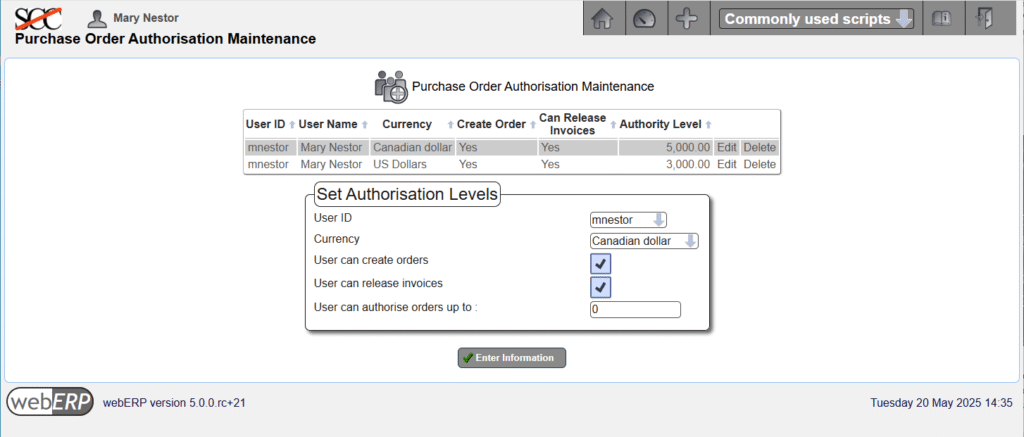
Purchase Order Authorization
To simplify matters, we will follow the process as a user whose a security role allows purchase order creation but also to authorize them. While it is desirable to seperate these functions into different people for risk and security reasons, but this is not necessarily possible for a small company and approving an order would be an unnecessary and annoying second step.
Purchase order authorization was enabled via [Main Menu > Setup > System Parameters], each currency must be individually authorized via [Main Menu > Setup > Receivables/Payables Setup > Set Purchase Order Authorisation Levels]
Bank Accounts
Bank accounts must be entered before recording payment to a vendor is possible.
[Main Menu > General Ledger > Maintenance > Bank Accounts]
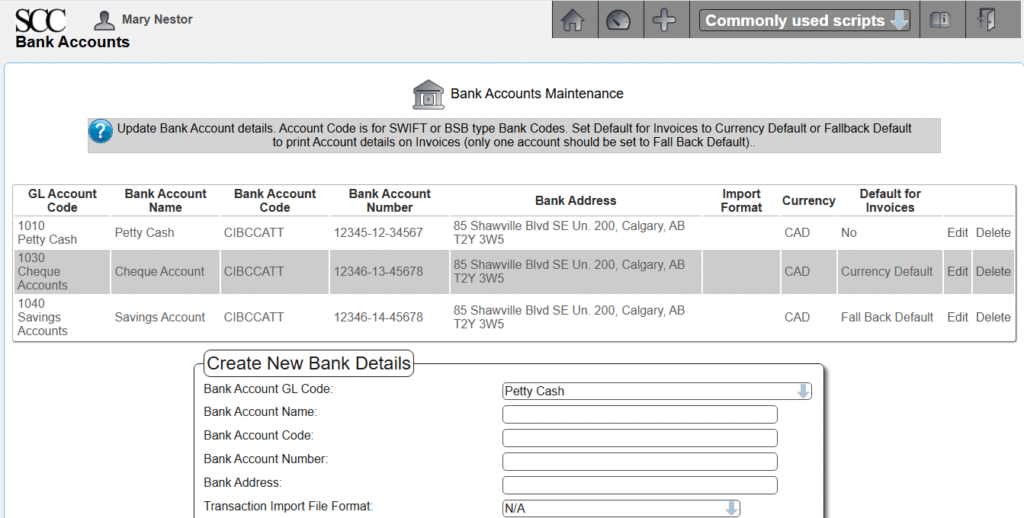
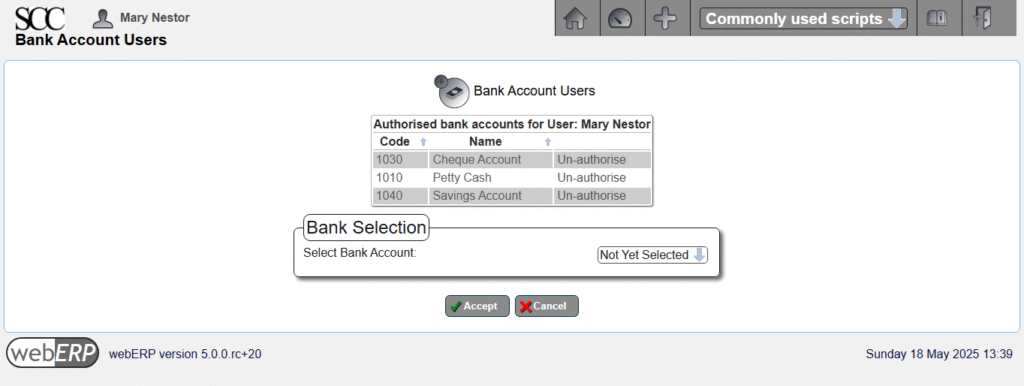
In addition to entering the bank account information, the user must also have authorization to use the bank accounts.
Bank account authorization can be accessed either by user or bank account.
[Main Menu > General Ledger > Maintenance > User Authorized Bank Accounts]
Tax Group
Although the Supplier is created when a bought-in Item is created in the PLM (Product Lifecycle Management) process, taxes are managed as a purchasing function.
The tax group determines the tax authorities to which the supplier reports and must collect taxes for. The tax group in conjunction with the inventory location record determines the rates of tax used in the automatic calculation of tax on suppliers invoices and credits. These rates can be over-ridden at invoice entry time.
Tax groups are created using the Tax Group Maintenance menu selection, we have created a “Default” tax group for purchases from Canadian suppliers received at the SCC’s main address in Alberta.
[Main Menu > Setup > General Setup > Tax Group Maintenance]
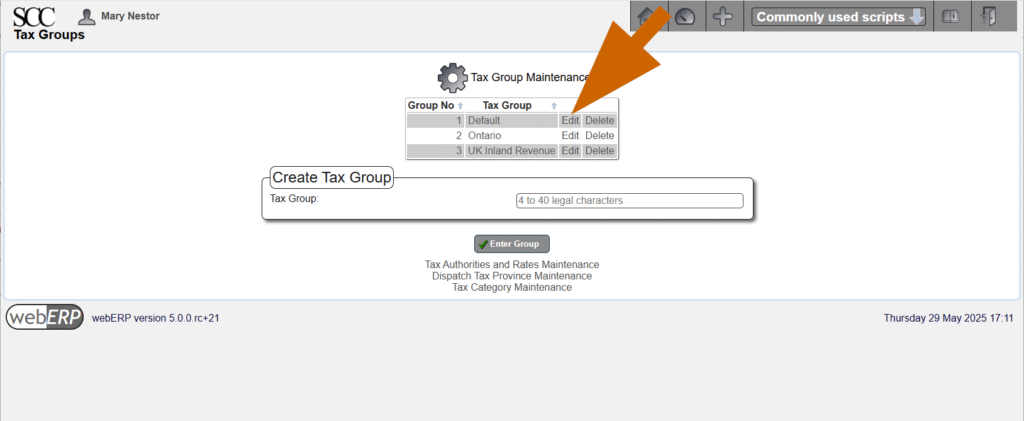
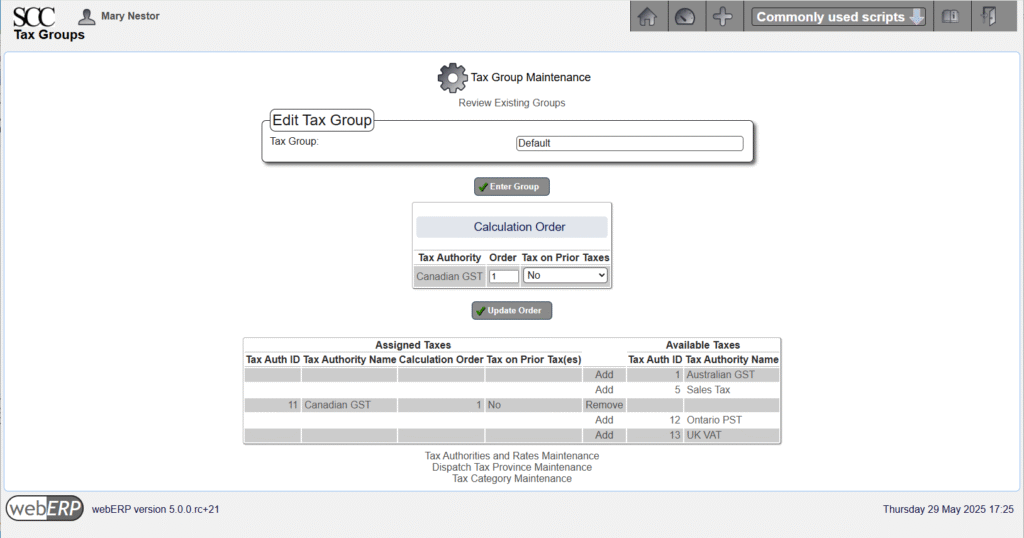
Edit the Tax Group to assign the appropriate Tax Authorities. You can see below that Canadian GST is the only tax authority assigned to the Default Tax Group.
Order Items
Before an inductor can be produced, the necessary raw material must be purchased.
For bought-in Items, it may be reasonable to insist supplier information must be entered when a new bought-in Item is created, which has already been done for the Items we will be ordering.
To see how a new supplier is created, refer to webERP tutorial “Manage Parts, Vendors and BOMs using webERP”.
This is the Bill of Materials (BOM) for item 100-0004 “IND, 830UH, AIRCRAFT WIRELESS”:

The unit of measure (UOM) for item 100-0001 wire is centimeters (cm), which means the wire will be received, stocked (kept in inventory) and consumed measured in centimeters. As we will see though, the wire will be purchased by spools, which is the vendor unit of measure, and the manufacturer’s datasheet shows there are 19,300 feet of wire on a spool (for more detail see my post Mange Parts, Vendors and BOMs using webERP).
Issue Order
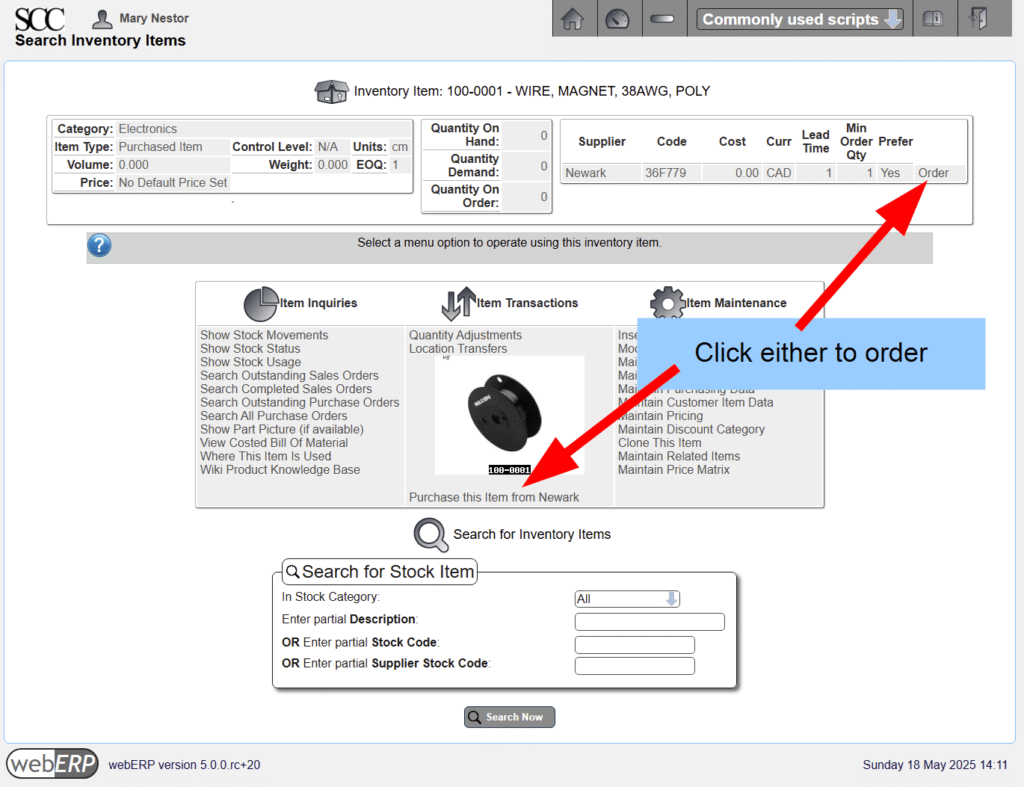
One method to start the order process is by selecting the item to purchase.
[Main Menu > Inventory > Select Item > Search > Select]
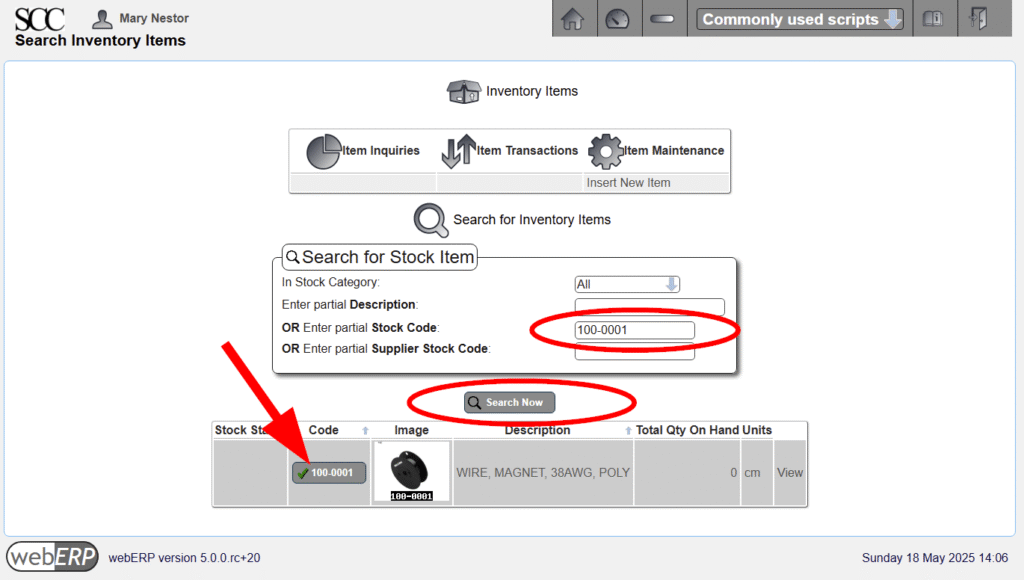
After selecting item 100-0001 an order can be initiated.
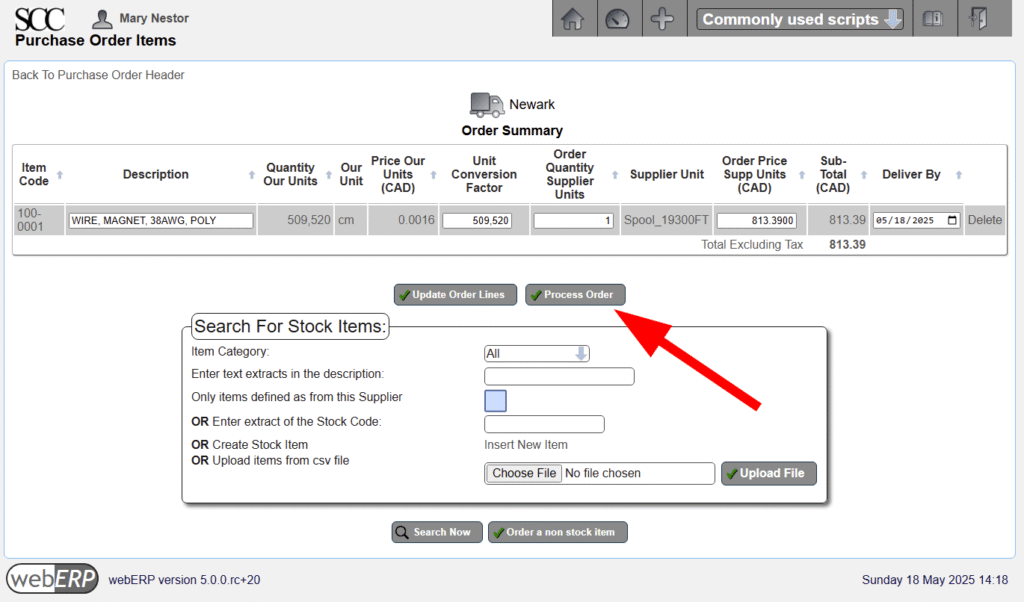
The order defaults to quantity 1 (spool), which in theory should be enough for 600 inductors. To place the order, click [Process Order].
If you change any values, you must click [Update Order Lines] before processing the order.
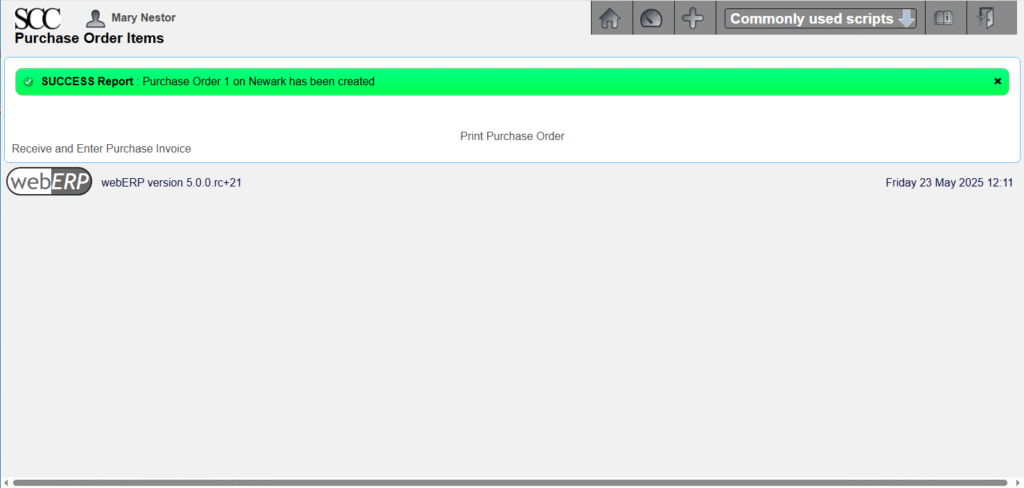
The order will be authorized automatically during processing because automatic authorization is enabled and the user Mary Nestor has purchase order authorization privileges. After processing, links are provided to Print Purchase Order or Receive and Enter Purchase Invoice.
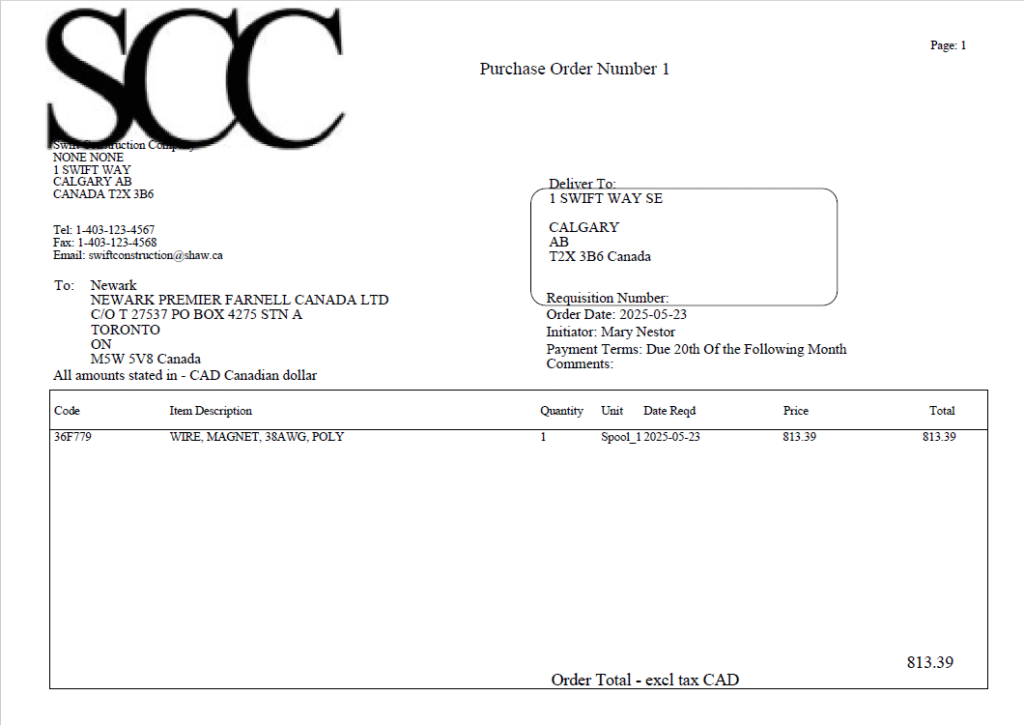
Printing the order creates a PDF document that can be saved or printed locally, or emailed to the vendor directly from webERP. More significantly, printing an order means to webERP that the order has been accepted by the vendor.
When a verbal order is given to a vendor, often the arrival of an invoice from the vendor is the trigger to create a purchase order. This is why a command to create a vendor invoice is provided. However, in this case, we will receive the order (i.e. recognise goods receipt) before creating a vendor invoice.
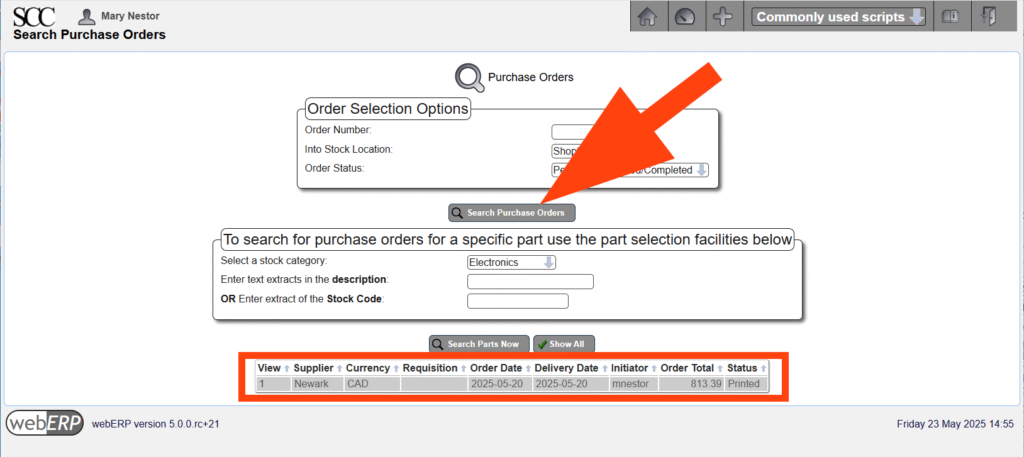
You can see that an order has been issued by searching for outstanding purchase orders.
[Main Menu > Purchases > Inquiries and Reports > Purchase Order Inquiry]
Receive Order
Orders are generally received after goods have been received or services have been performed. For physical goods, receiving can be considered to be when ownership of the goods transfers from vendor to company.
We will start the receiving process by searching for outstanding orders for item 100-0001.
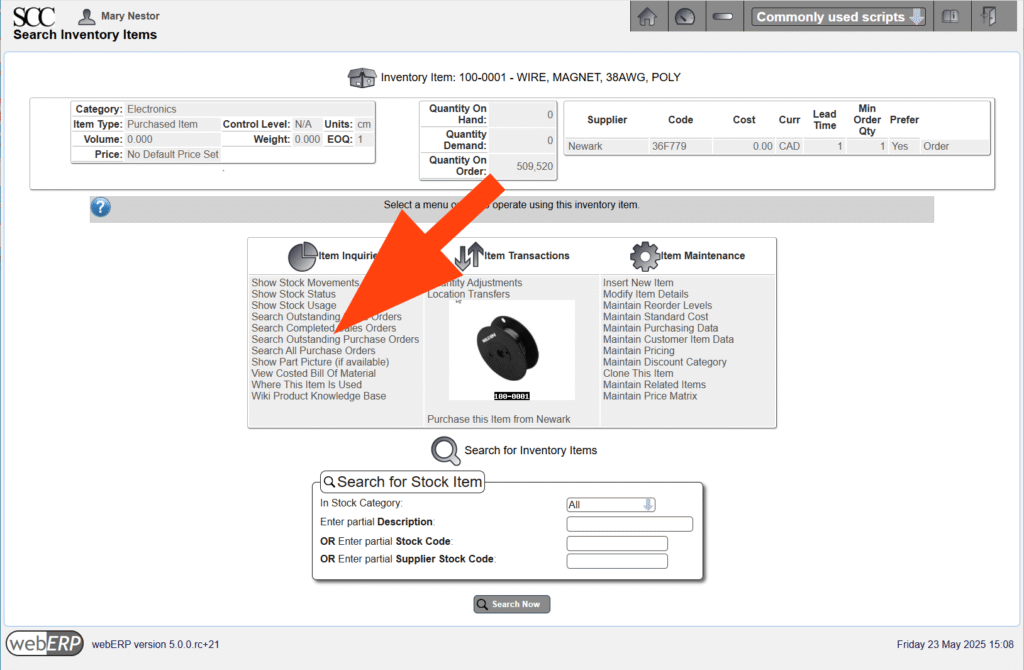
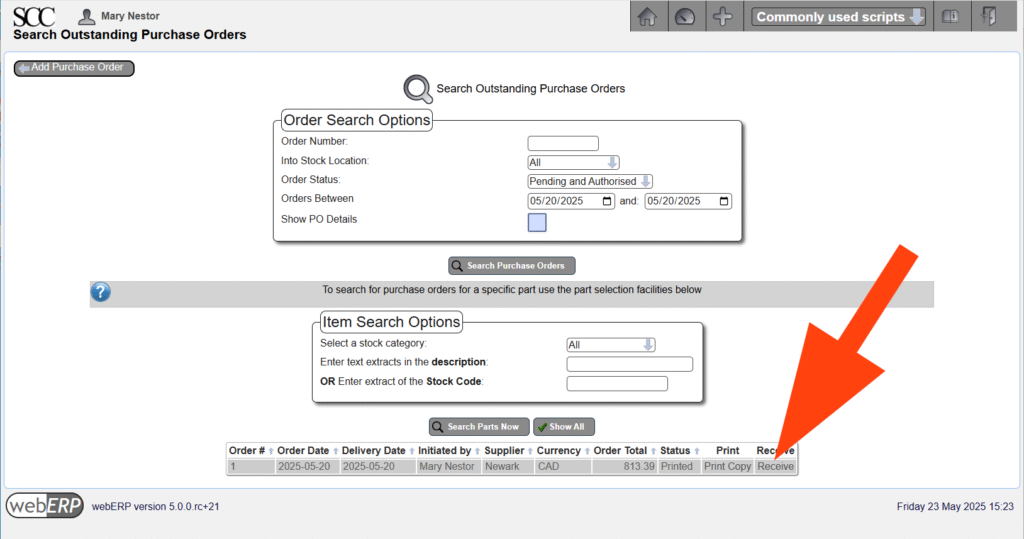
After selecting the appropriate purchase order, the order can be received so long as it has been authorized and printed.
[Main Menu > Inventory > Select an Item > {select 100-0001} > Search Outstanding Purchase Orders > {select PO #} > Receive]
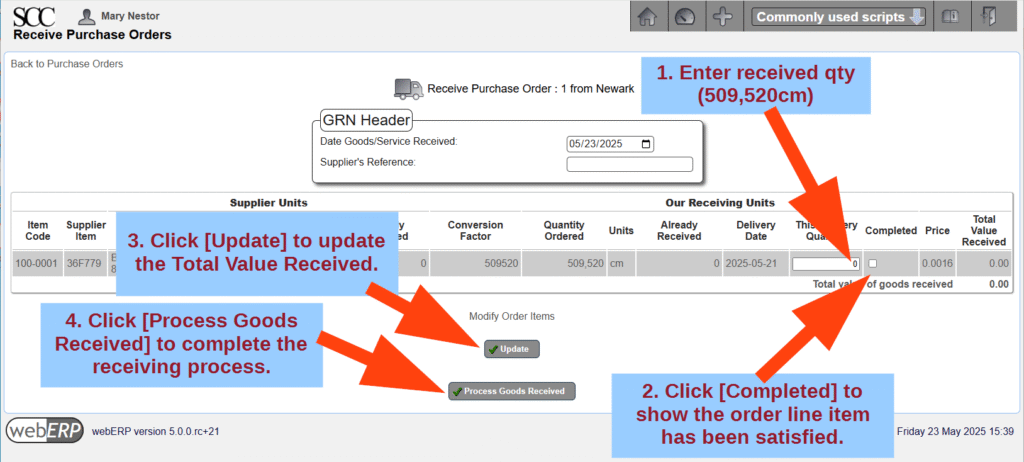
The Goods Received screen shows and allows the quantities received to be entered. The quantity in purchase units is shown together with the conversion factor from purchase units to the item’s unit of measure. Enter the receive quantity must be entered in the item’s unit of measure.
After processing, links are provided to print a Goods Received Note (GRN) and to print QA labels for sticking on the physical goods for identification.

Per SCC protocol, the receiver prints, signs and sends the GRN to the Accounts Payable department, where it will be matched with the vendor invoice before payment is made.

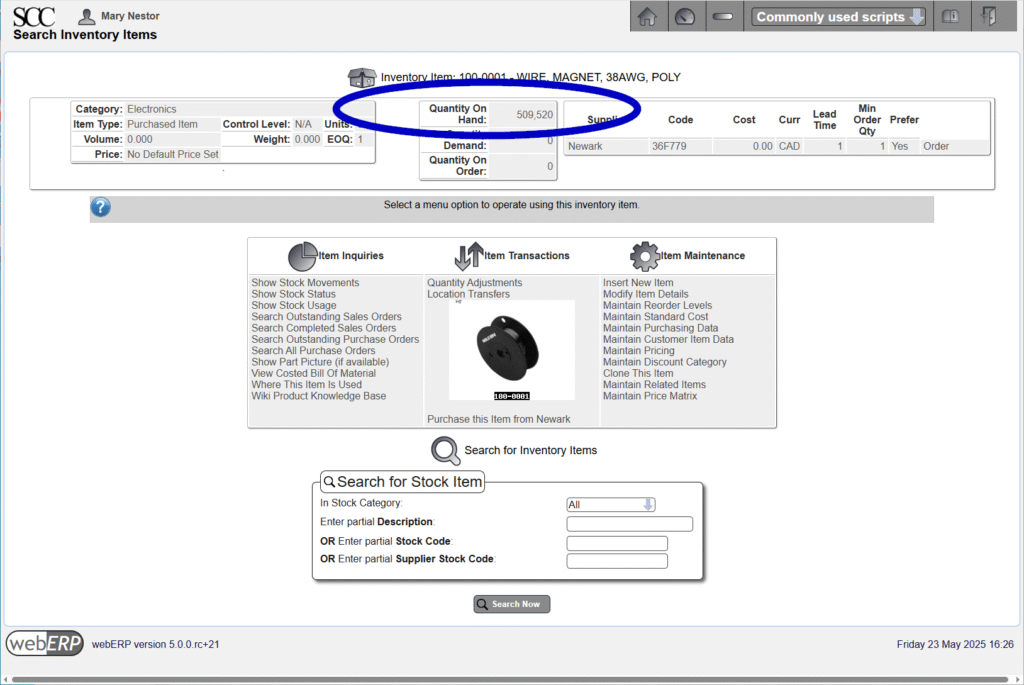
If you view Item 100-0001 again you will see the quantity on hand now reflects the received order.
Pay Supplier
Create Supplier Invoice
A supplier invoice is created to record an invoice received from a supplier for goods or services provided. A common industry process is to match the vendor invoice to 1) the purchase order and 2) a goods receipt notice (GRN), before issuing payment to the supplier.
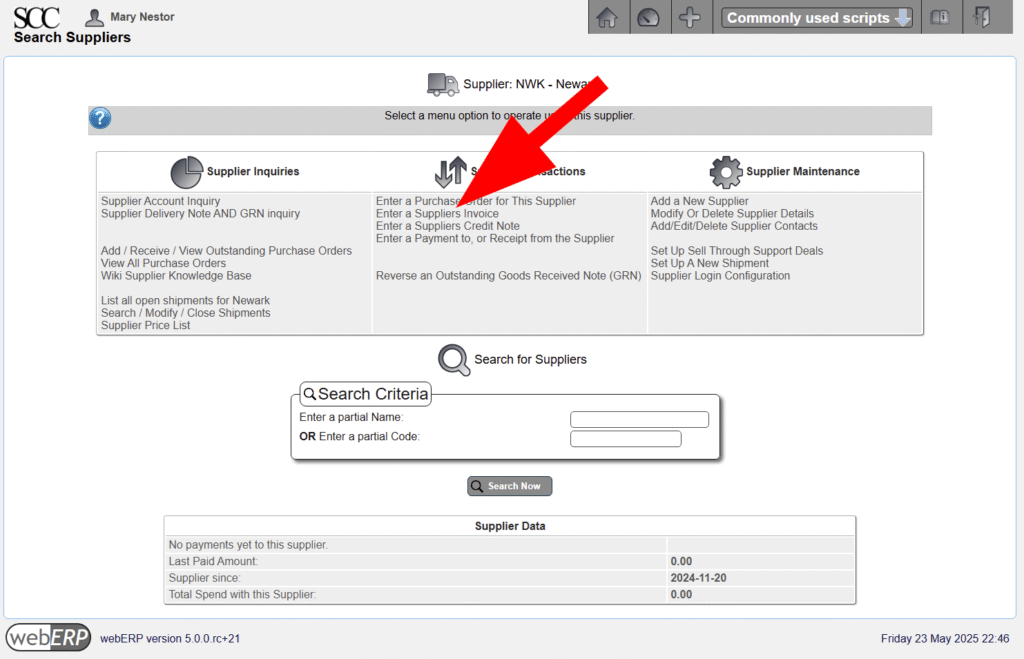
One way to start the supplier invoice process is to search for the supplier providing the invoice following [Main Menu > Payables > Select Supplier > Search > {select supplier}]
After selecting the supplier, click [Supplier Transactions > Enter a Supplier Invoice].
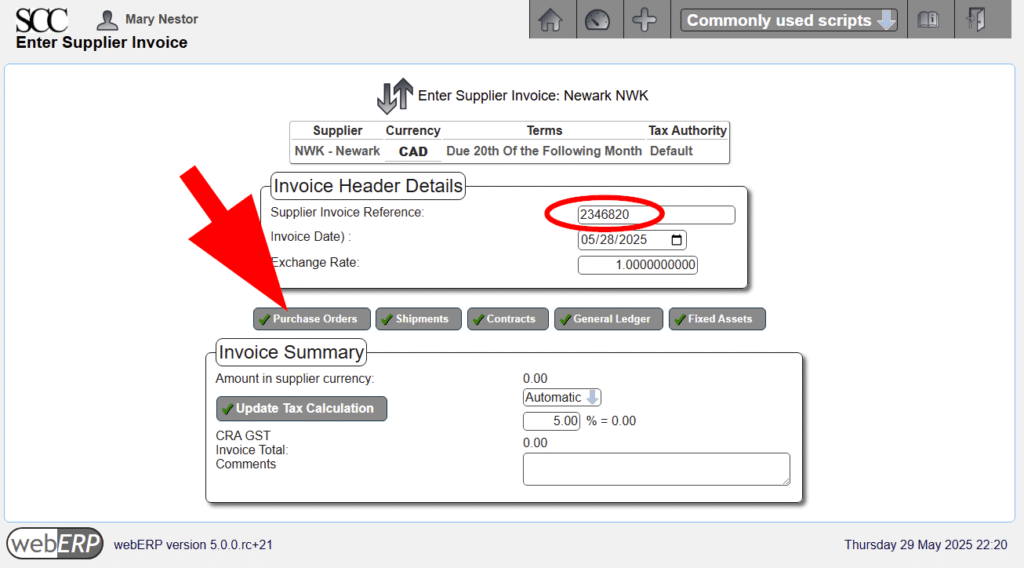
Enter a reference identifier for the supplier invoice if one is available.
Supplier invoice references must be unique for each supplier.
Next, click the [Purchase Order] button and match the vendor invoice to the purchase order.
[Main Menu > Vendors > Vendor Transactions > Enter a Vendor Invoice > Purchase Order]
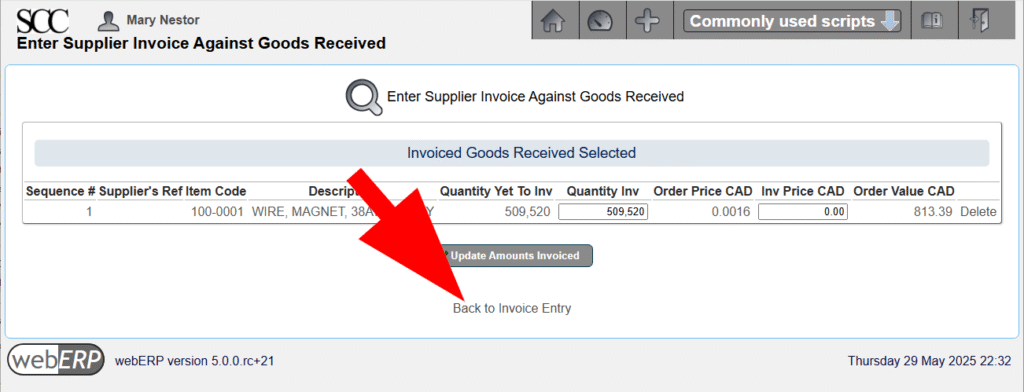
Select the purchase order line item that the vendor invoice pertains to and add to the invoice.
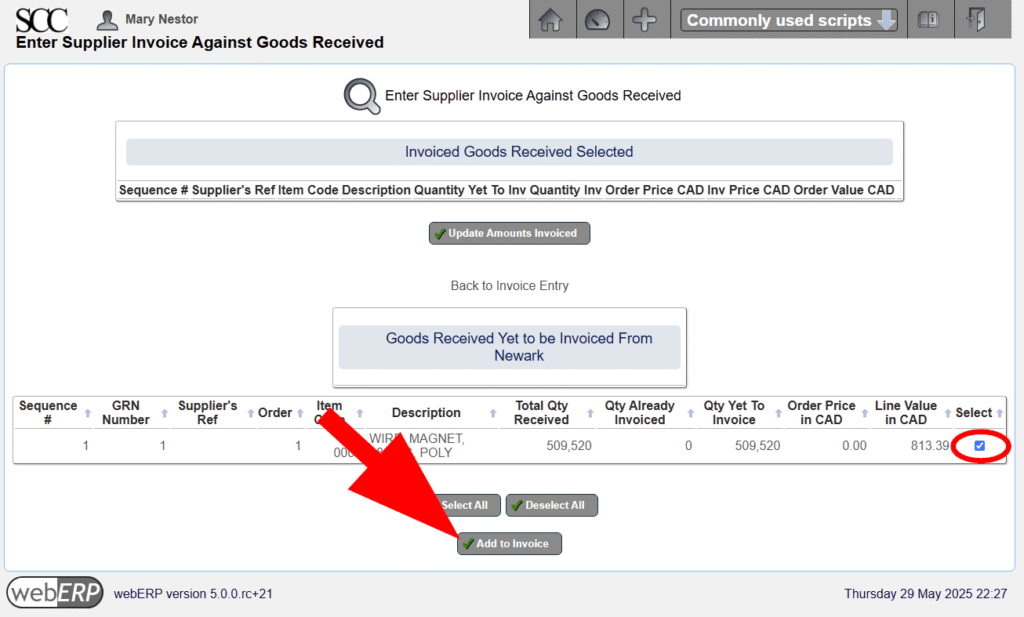
After adding the order reference to the vendor invoice, return to invoice entry.
Add a comment and enter the invoice.
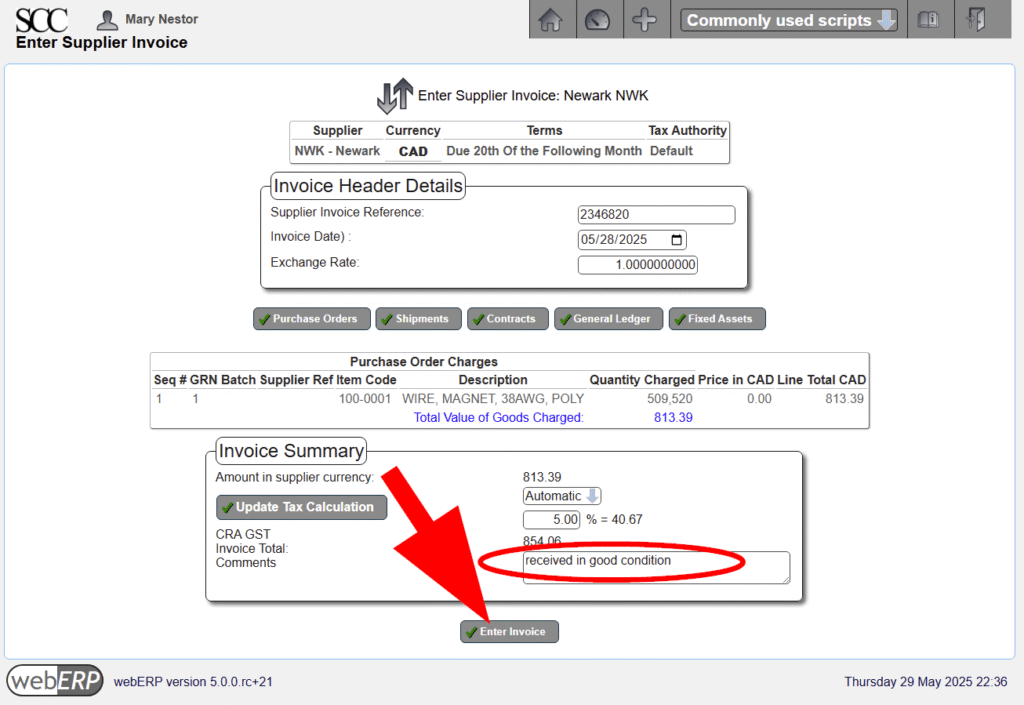
The vendor invoice has now been created.

You could next record payment of the invoice using the Enter Payment function, but we will start from the beginning to reinforce the procedure.
Issue Supplier Payment
FOLLOWING CONTENT HAS NOT BEEN UPDATED TO webERP v5 (images and text refer to v4)
The vendor can be paid as soon after a purchase order has been printed, a goods receipt notice has been created, and a vendor invoice been created. However vendors will typically be paid based on operational procedures and vendor payment terms. One way to start the vendor payment process is to select the vendor again.
[Main Menu > Vendors > Select Newark]
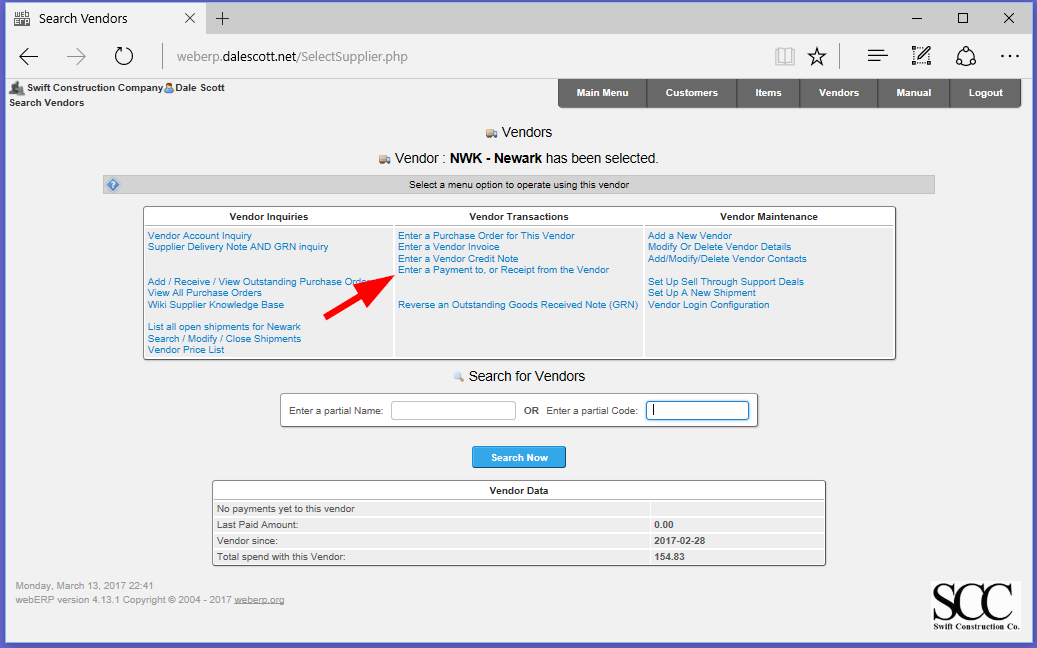
Use the Enter a Payment to, or Receipt from the Vendor command to access the Bank Account Payment Entry screen.
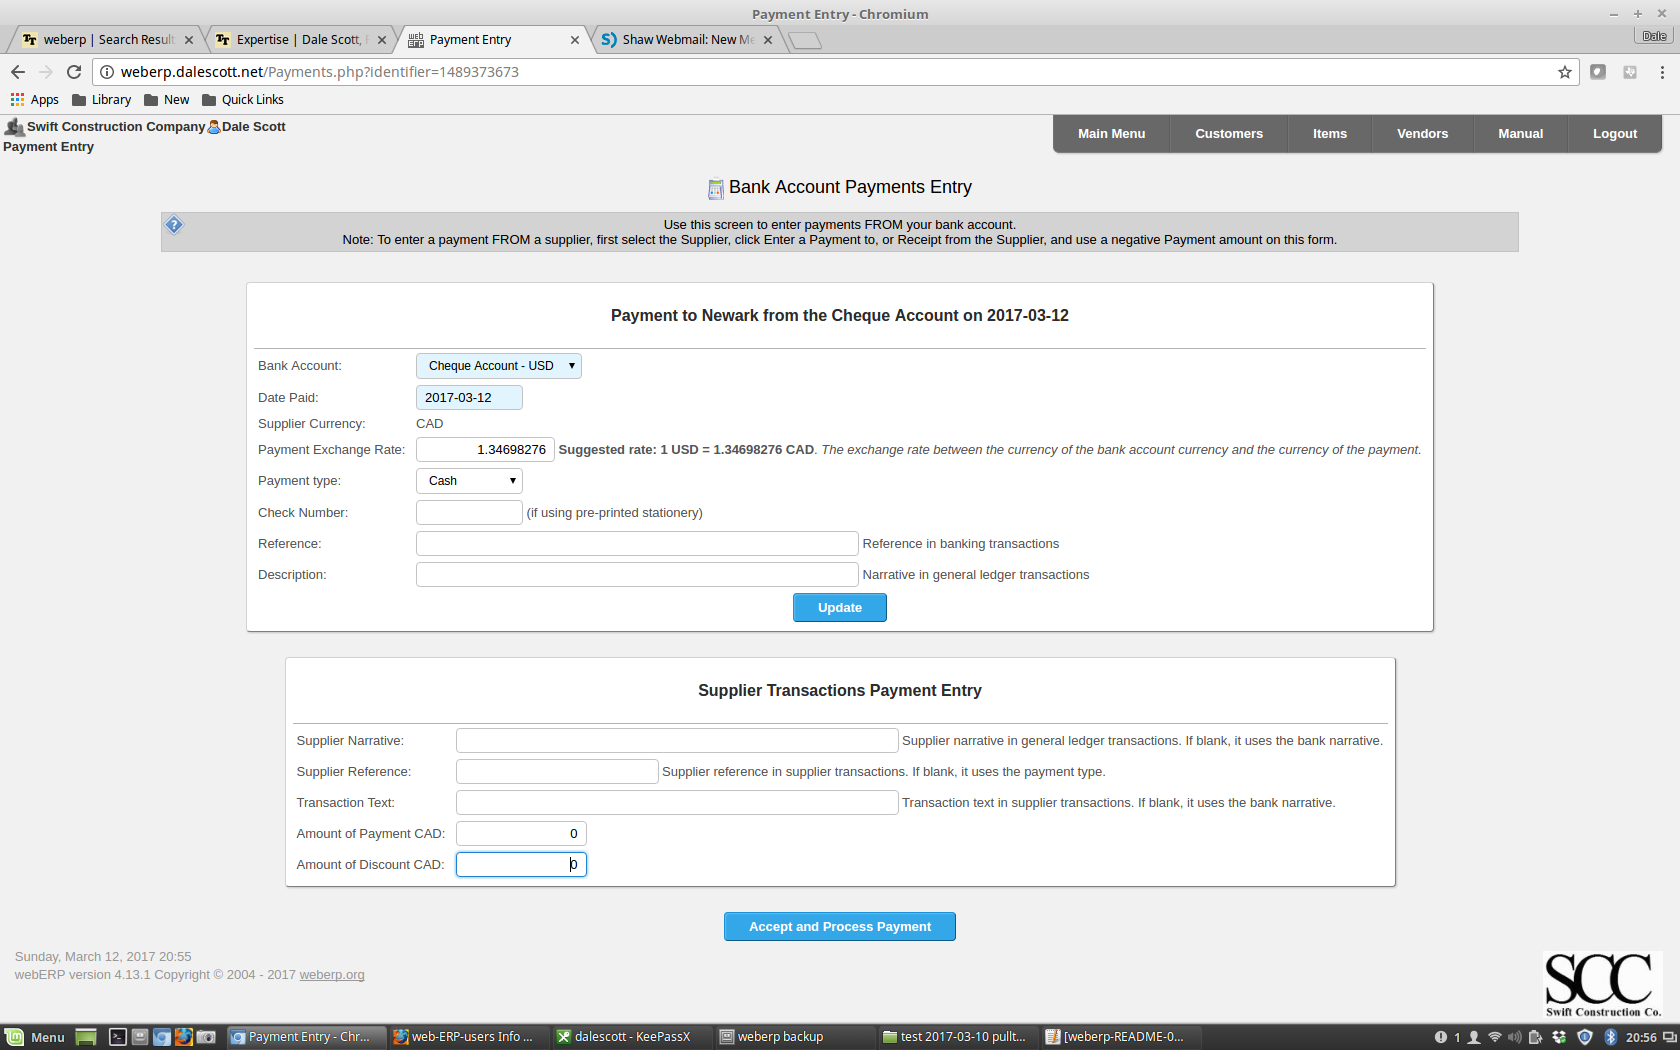
Enter the cheque reference and description.
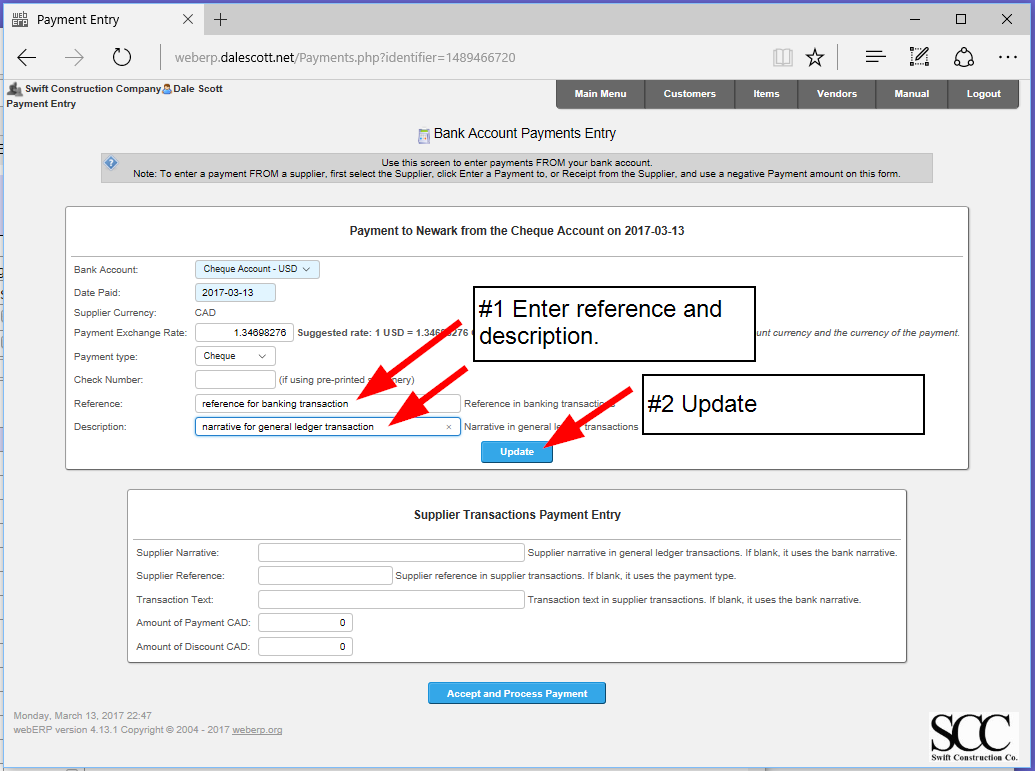
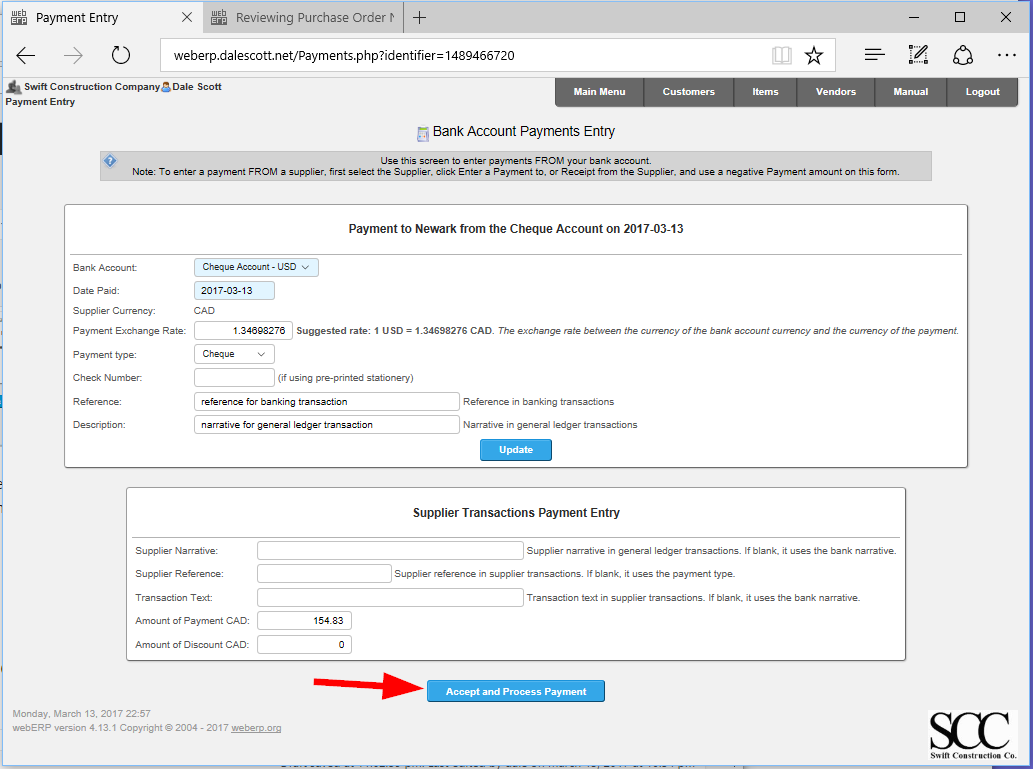
If desired, you can enter a Supplier Narrative, Reference and Transaction Text for the supplier transaction payment. I will leave them blank and they will populate as indicated. Finally process the payment.
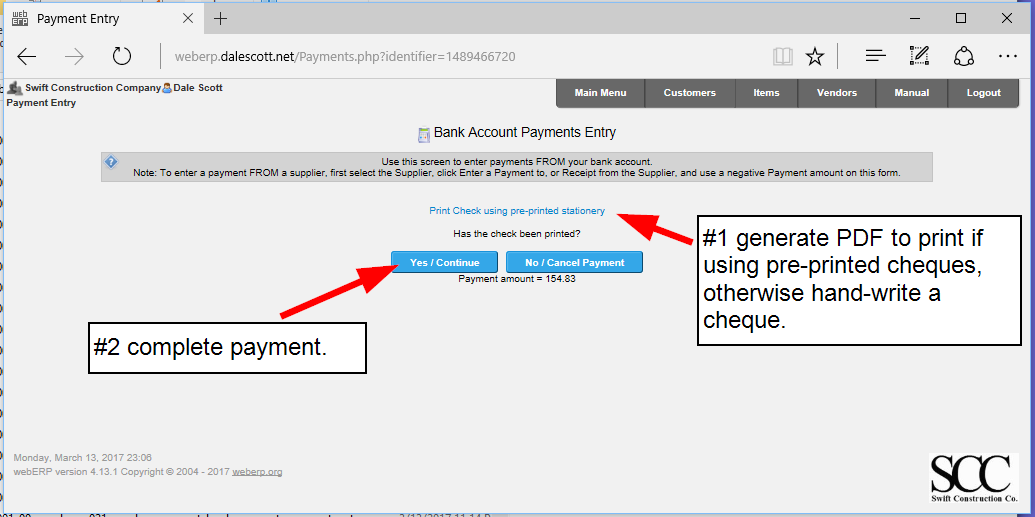
Optionally print the cheque and complete the payment.
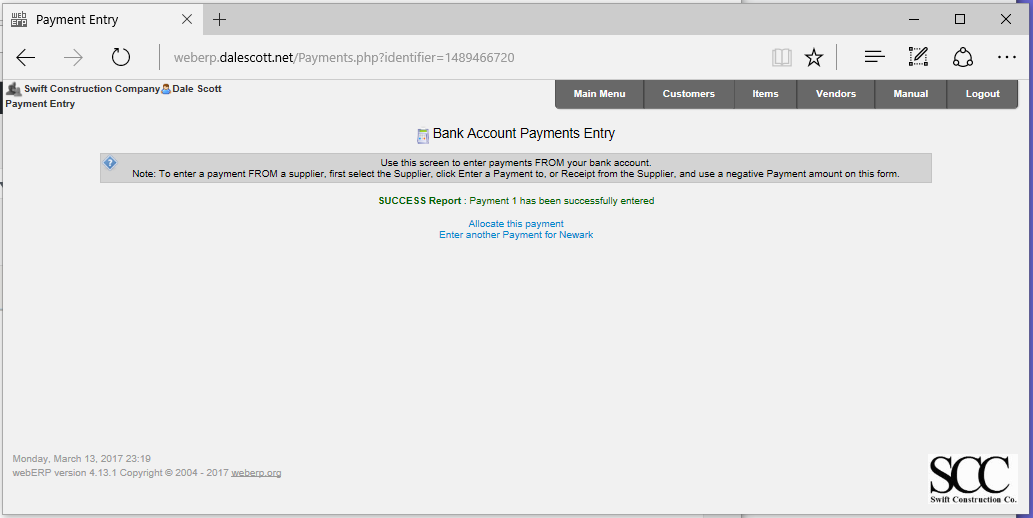
The payment can be allocated from the final screen, but this is the end of the purchasing cycle for this example.
Rinse and Repeat
Now that item 100-0001 has been dealt with, I will order sufficient quantities of items 100-0002 and 100-0003 to manufacture custom inductor item 100-0004 (manufacturing will be described in a seperate post).
Reports
A variety of reports are available related to the materials procurement process.
For example, to find a supplier for an item or to investigate an item:
- Show all suppliers for a particular item.
- Show Where-Used for an item (parent BOMs that include an item)
- Show purchase orders for an item.
Further, a number of general reports list items that require ordering, or received orders waiting to be paid for.
Aged Supplier Report
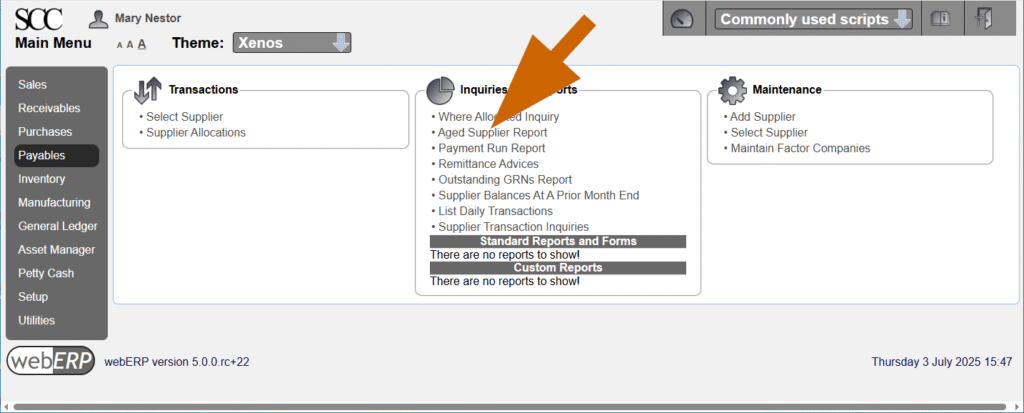
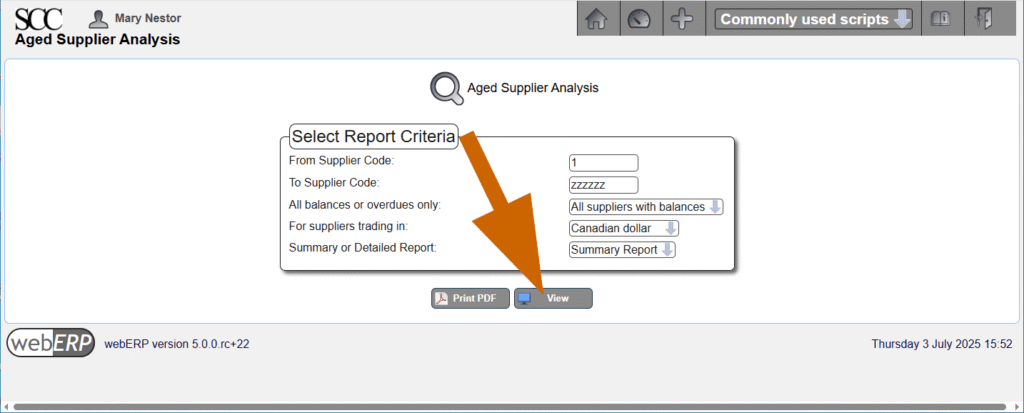
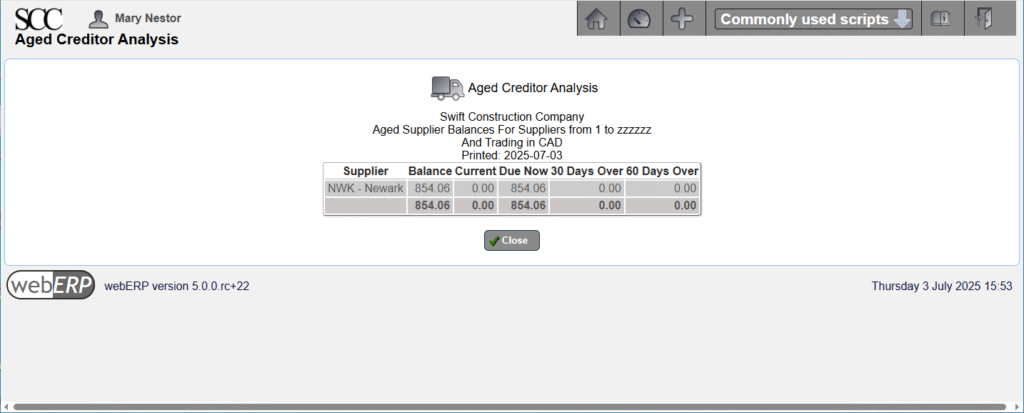
An Aged Supplier Report shows the amount owed to suppliers (Payables), and the amounts 30 days over due and 60 days over due.
For example, the wire ordered from Newark has been received and Newark’s invoice for $854.06 is due now.
[Main Menu > Payables > Inquiries and Reports > Aged Supplier Report]
Change Happens
When an custom item is revised, it may impact on items already purchased and waiting to be received, or items which are about to be ordered:
- Cancel POs if possible for items no longer required
- Modify POs to mitigate cost, possibly reducing quantities, extending delivery dates, stopping vendor work and paying only for work performed to date, and modifying vendor work to meet new requirements.
It can be helpful to proactively check for new part numbers, or new revisions of existing part numbers. Presumably they will need to be ordered eventually, and in the case of a revision may indicate changes coming for orders of current revisions.
Summary
This completes the overview of purchasing using webERP.
In Section 2, Chapter 10 – Advanced Purchasing we will learn how to automatically purchase all the items on a BOM, which can save considerable time.
Chapter 5 – Selling
This chapter is a work in progress.
A business exists to sell products or provide services. This chapter introduces the sales cycle, starting with creating a product with initial stock, and creating a customer. Then a draft sales order or quote is created for the product, the order is confirmed, and then picked and shipped. The customer is invoiced, and finally payment is received.
Selling can be physical goods or intangible services. If you are selling physical goods, you will need stock before selling, either purchasing the stock directly from Suppliers or purchasing raw material to transform through a manufacturing process.
An Enterprise Resource Planning (ERP) system offers significant advantages for sales operations by centralizing customer data, product information, and pricing into a single, unified platform. This integration streamlines the entire sales process, from order entry to fulfillment, by eliminating manual data re-entry and reducing errors. Furthermore, ERP systems provide real-time visibility into inventory levels and order status, enabling sales teams to provide accurate information to customers and manage expectations effectively. The robust reporting and analytics capabilities within an ERP allow for deeper insights into sales performance, customer trends, and forecasting, empowering data-driven decision-making. Ultimately, leveraging an ERP for sales enhances efficiency, improves customer satisfaction, and drives revenue growth through optimized workflows and informed strategies.
Features of using webERP for selling include:
- Efficiency. Items, Customers, Sales Orders, Shipping Orders, etc. are managed within one controlled system. Fix a problem once and it’s fixed everywhere.
- Visibility. Because all data and transactions reside and are performed in a single system, it is also available to all users (subject to security roles and privileges).
- Scalable. Readily scales with users, items, and customers, and can adapt to changing business processes.
This chapter introduces the sales cycle, starting with creating a product with initial stock, and creating a customer. Then a draft sales order or quote is created for the product, the order is confirmed, and then picked and shipped. The customer is invoiced, and finally payment is received. Concepts such as Units of Measure (UOM), Cost Price, Categories and Taxes, and Fiscal Periods are introduced along the way.
The Aircraft Wireless product will be used as an example. Documentation will be stored in the webERP Knowledge Base (integration with WackoWiki CMS).
Goals
- Receive purchase orders from a customer.
- Ship goods to a customer from inventory.
- Receive payment from a customer.
Sales Terminology
- A Customer is a party who purchases goods or services from a Supplier.
- A Purchase Order is a request from a purchaser, for a specific item and according to specific terms. The purchase order is generally considered legally binding when the supplier reports the order was accepted.
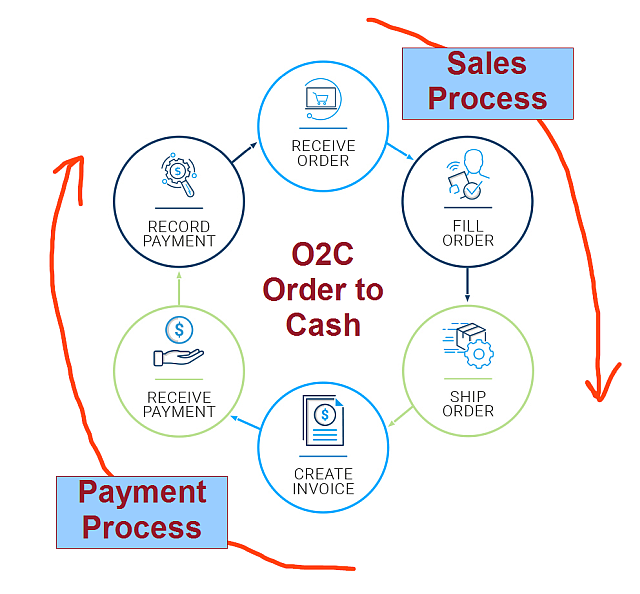
- O2C – Order to Cash – the customer sales and payment process.
Sales Cycle
The sales cycle is sometimes called the Order-to-Cash (or O2C) process. It starts with identifying a prospect or lead, possibly by clicking on an online ad, answering a cold-call, or just walking into your store, progresses to a paying customer, and then repeats.
- Identify lead
- Quote sale of product or service
- Convert the lead to a sale
- Ship goods or perform service
- Invoice customer
- Receive payment
- Repeat
Not all companies and circumstances require all steps, or may change the order of some steps depending on the product and customer.
The high-level sales and payment process cycle is commonly called Order to Cash, or O2C.
webERP Sales and Accounts Receivable
There are five primary tasks associated with sales orders and accounts receivable in webERP.
- Counter Sales
- Create order, invoice and receipt records in one process (order location is “Cash Sales Customer”).
- Order Process
- Enter order > Print order and dispatch note > Confirm quantities dispatched and invoiced > Print invoices and send to customers.
- Produce and Send statements
- Perform during month-end tasks.
- Enter Customer Receipts
- Enter multiple cheques in a one batch or single batch for each transaction listed on a bank statement.
- Allocate Receipts and Credits
- Allocations create exchange differences between invoice rate and payment rate (can be un-done and re-done at any time).
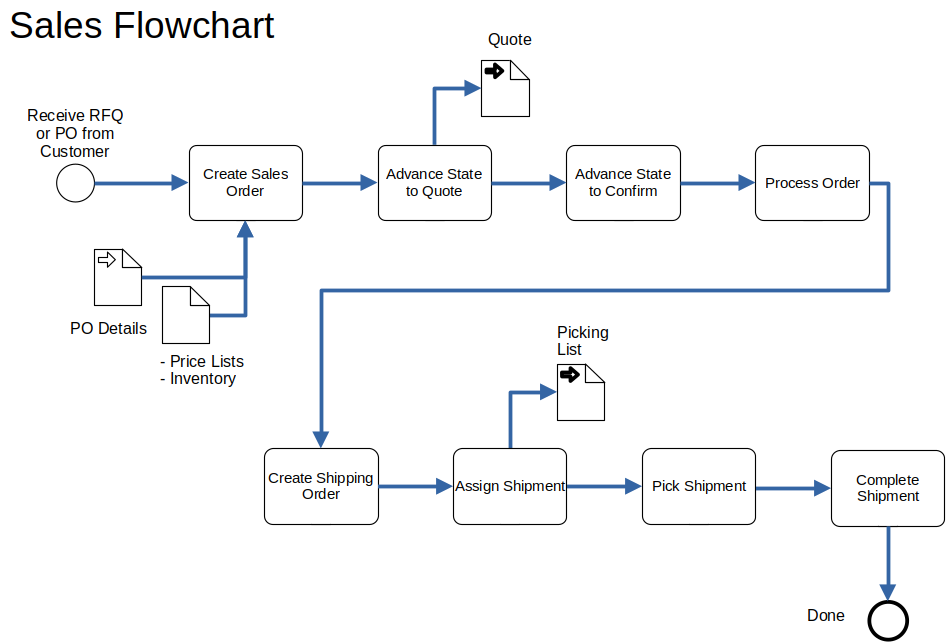
- Step 1. Create a sales order in response to a customer purchase order.
- Step 2. Advance Sales Order to Quototion status (the cost is determined).
- Step 3. Advance Sales Order to Confirmed status (a contract now exists and the order can be processed).
- Step 4. Process order.
- Step 5. Create a Shipping Order to trigger shipping the ordered goods.
- Step 6. Assign and pick shipment.
- Step 7. Complete the shipment, which is a trigger for the invoicing procedure.
TODO correct flow chart per happy path. ignore price lists.
TODO add swim-lane drawing (potentially replace flow chart if superior)
User Permissions
We will login as user “mnestor” (Mary Nestor), who is assigned the Administrator security role and has permission for almost all operations. If a user with a different security role is needed it will be noted.
In actual use, it is important that each user has their own login with a password only they know. This allows who performed a transaction or operation to be identified after the fact for tracibility and can be especially important in regulated industries.
Default (out-of-the-box) security permissions will get you started but you should create bespoke security roles and token assignments based on the structure, staff and roles of your company.
For more information on User Permissions, see Section 2, Chapter 8 – User Permissions.
Setup
Before customers can be created the following information is required:
- Currencies – the currency of the customers’ account.
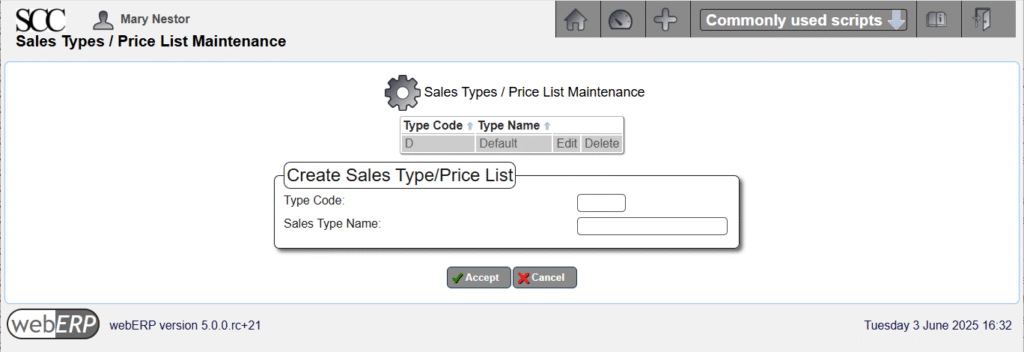
- Sales Types – the sales type is combined with the currency of the customer to determine the price list applicable to the customer. Item prices are held against sales types and currencies, and each customer must reference a sales type. The sales type typically reflects if a sale is a trade sale, retail, wholesale, indent, cash sale, special sale, etc., and as many many sales types as necessary can be created. A Sales Type is required to set an Item Price and scripts may assume at least one Sales Type exists.
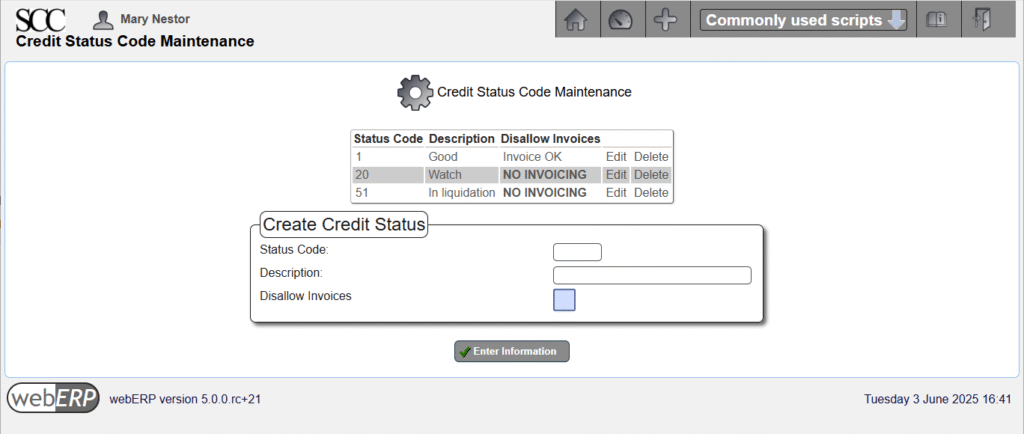
- Credit Status – indicate the credit-worthiness of a customer. Each customer must reference a credit status type and some credit status records can be configured to prohibit invoicing.
- Payment Terms – terms governing payment associated with a customer. As many terms records as necessary can be defined. The customer must reference a parcular payment terms.
- Tax Groups – the groupings of tax authorities the supplier must collect tax for on customer sales. Each customer branch must refer to a tax group. Sales to these branches will automatically calculate the tax based on where the sale is from and the tax category of the item being invoiced.
A customer must have at least one branch. The branch determines the tax group for where product will be received (typically a specific geographic location or region), and the company location from where product will be supplied (could be the company head office address, but could be a seperate location and even potentially the company warehouse closest to the customer), which taxes may also depend on. In addition, Accounts Receivable requires customer branch information such as delivery address.
The following information must be entered before a customer branch can be created :
- Sales Areas – for reporting and analyzing sales by area. GL integration can be configured to query the area of a customer to determine the GL account for posting sales to. Each customer branch must referance a sales area (define a “Default” area if more specific sales areas are not needed).
- Location – somewhere stock can be held, e.g. a warehouse. Each customer branch needs to refer to the stock location for it to draw stock from.
A sales person must be designated for each company branch who is responsible for managing the sales relationship and takes credit for sales to the branch. If sales people are not necessary for your business, you can define a single salesperson naned “Default” or similar.
Currencies
Currencies that will be involved in sales and payment processes will need to be configured in webERP before they can be used.
Currency management is first covered in the Configure a company with webERP chapter.
[Main Menu > Setup > General Setup > Currency Maintenance]
Sales Types
[Main Menu > Setup > Receivable/Payables Setup > Sales Types]
Credit Status Codes
[Main Menu > Setup > Receivables/Payables Setup > Credit Status]
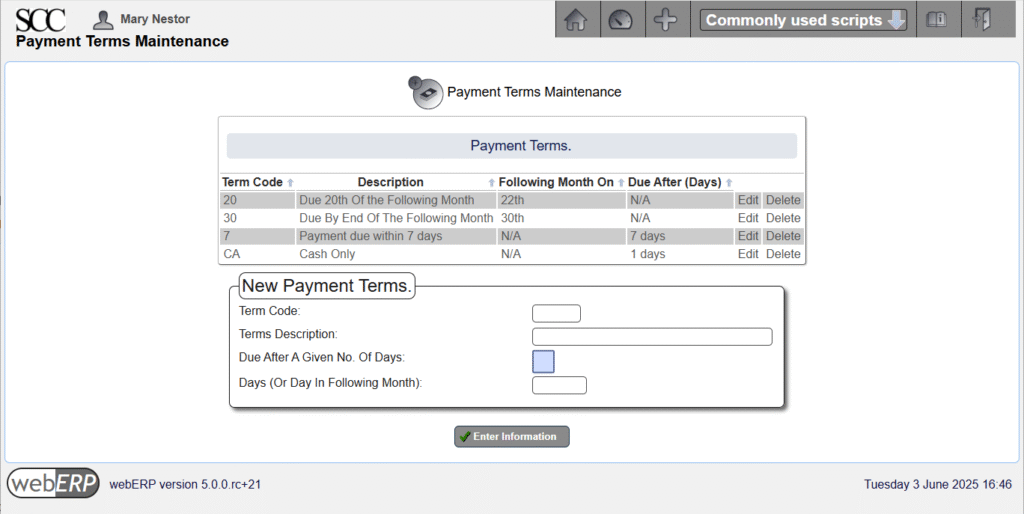
Payment Terms
Payment terms are the agreed-upon terms covering payment by the customer. Often the Supplier provides terms with their purchase order, which are accepted when the supplier accepts the customer’s purchase order. If the terms provided with the purchase order are not acceptable to the supplier, they must be negoiated before the purchase order is accepted.
Payment terms are first covered in the Purchasing with webERP chapter.
[Main Menu > Setup > Receivables/Payables Setup > Payment Terms]
Tax Groups
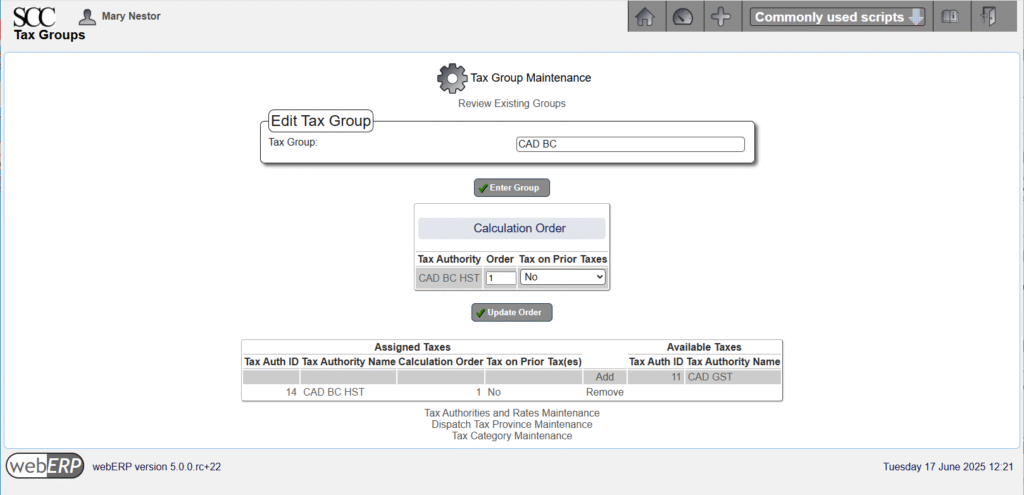
Tax groups are used to determine the taxes owed to a tax authority based on the customer and the location where the goods are received.
Payment terms are first covered in the Purchasing with webERP chapter but selling is more complicated. Tax to be collected can depend not only on the location of the seller but also the location of the buyer and where custody of goods changes.
The first customer for the Aircraft Wireless is B&E Submarines, a Canadian company operating in the province of British Columbia. B&E will be paying in advance for development costs and the first 10 Aircraft Wireless units.
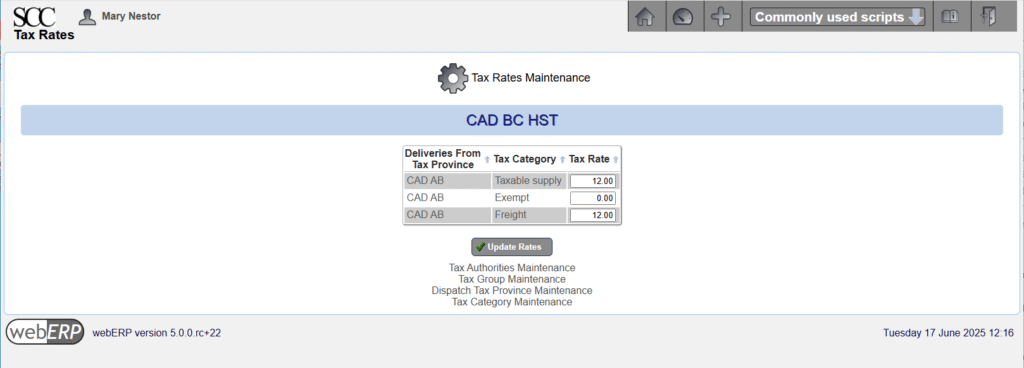
B&E is located in a different province in Canada than the SCC. the SCC will need to collect 5% of a sale to B&E for GST, seperately collect 7% of a sale to B&E for BC PST and remit both to the CRA (the SCC has not registered for BC PST but will do so if the Aircraft Wireless product is a succes, afterwhich will submit BC PST directly to BC)
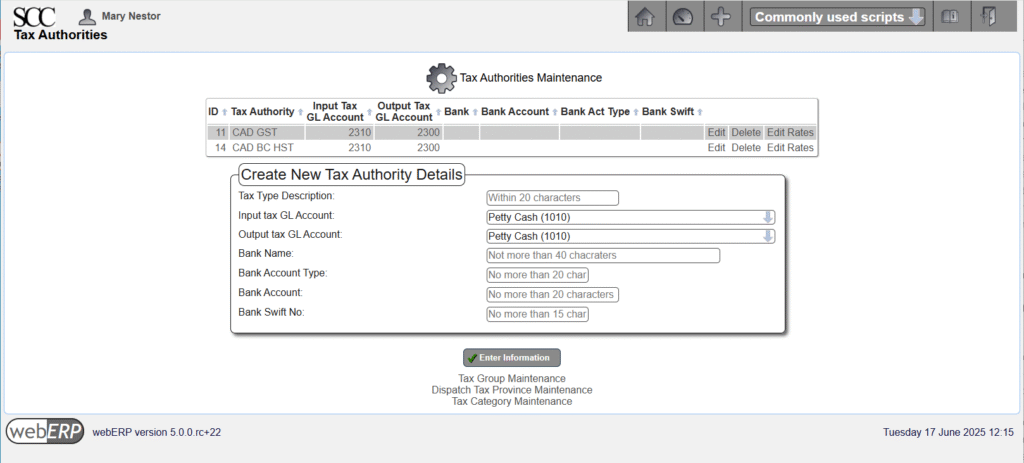
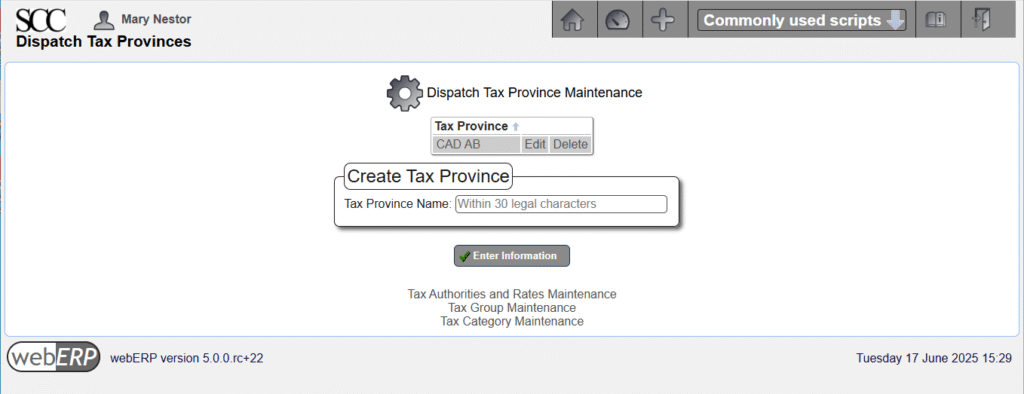
First, a new tax authority “CAD BC HST” and tax group “CAD BC” (using the CAD BC HST tax authority) and then B&E will be switched to the new group.
[Main Menu > Setup > General Setup > Tax Group Maintenance]
[Main Menu > Setup > General Setup > Tax Authorities and Rates Maintenance]
[Main Menu > Setup > General Setup > Tax Authorities and Rates Maintenance > CAD BC HST > Edit Rates]
[Main Menu > Setup > General Setup > Dispatch Tax Province]
Sales Areas
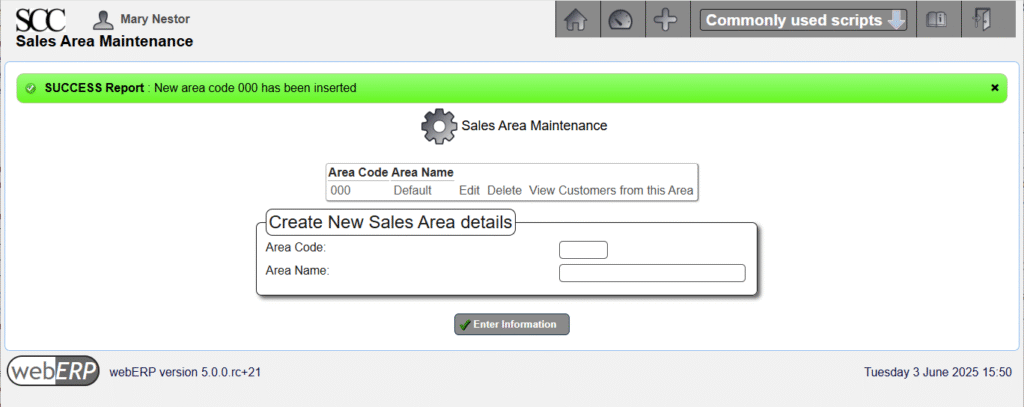
Sales are used when reporting on sales and at least one sales area must be defined.
The SCC creates a 000 (Default) sales area, which will be sufficient for now as the SCC does not require reporting on sales based on area.
[Main Menu > Setup > Receivables/Payables Setup > Sales Areas]
Locations
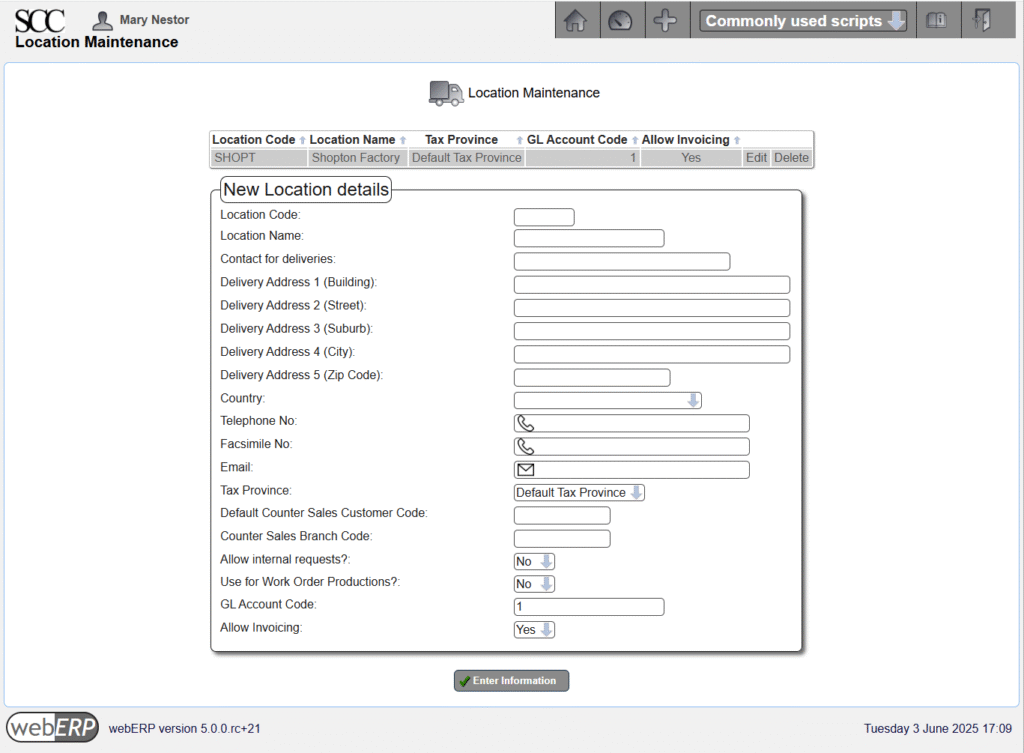
Inventory locations are locations holding stock for shipping to customers. Taxes may also be calculated based on the inventory location (the assigned Tax Province).
Inventory locations are first covered in the Manage Parts, Suppliers and BOMs with webERP chapter.
[Main Menu > Setup > Inventory Setup > Inventory Locations Maintenance]
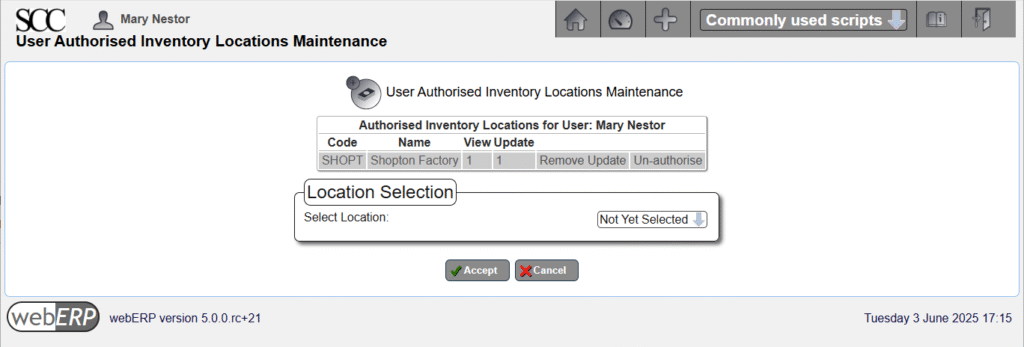
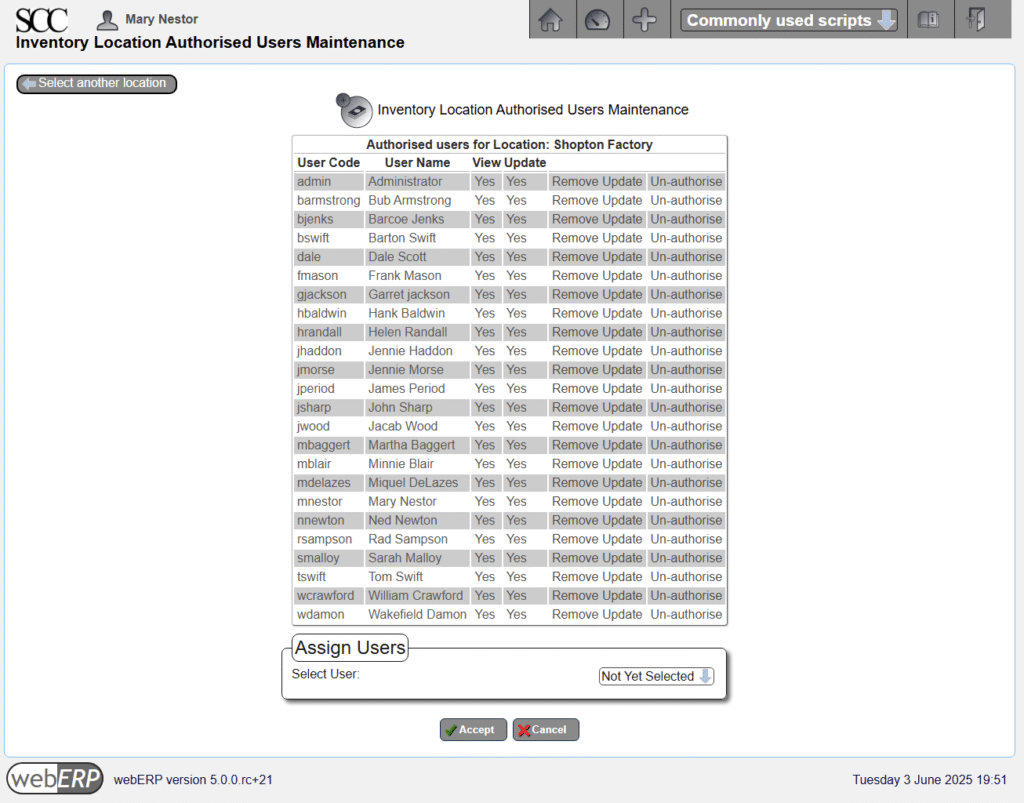
Users must also be individually authorized to operate on an inventory location, either by user,
[Main Menu > Setup > Inventory Setup > User Authorised Inventory Locations Maintenance]
or by location.
[Main Menu > Setup > Inventory Setup > Inventory Location Authorised Users Maintenance]
Bank Accounts
Bank accounts must be defined for recording sales and payment transactions.
Bank accounts were first covered in the Purchase with webERP chapter.
[Main Menu > General Ledger > Maintenance > Bank Accounts]

In addition to entering the bank account information, the user must also have authorization to use the bank accounts.
Bank account authorization can be accessed either by user or bank account.
[Main Menu > General Ledger > Maintenance > User Authorized Bank Accounts]

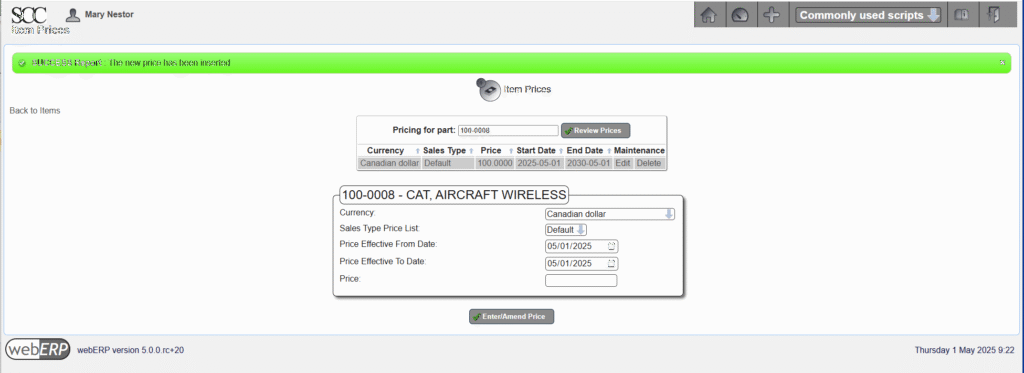
Set Price
Items to be sold must have a set price. The price may have been set when the item was created (first covered in the Manage Parts, Suppliers and BOMs with webERP chapter), but if not a price can be entered now.
The price can be over-ridden in a sales order.
webERP includes a price list feature that is covered in more detail seperately. TODO include name of chapter.
[Main Menu > Inventory > Maintenance > Select an Item > {select item} > Maintain Pricing]
Create Customer
TODO describe creating customer.
Create Order
TODO describe issuing order.
TODO describe issuing order.
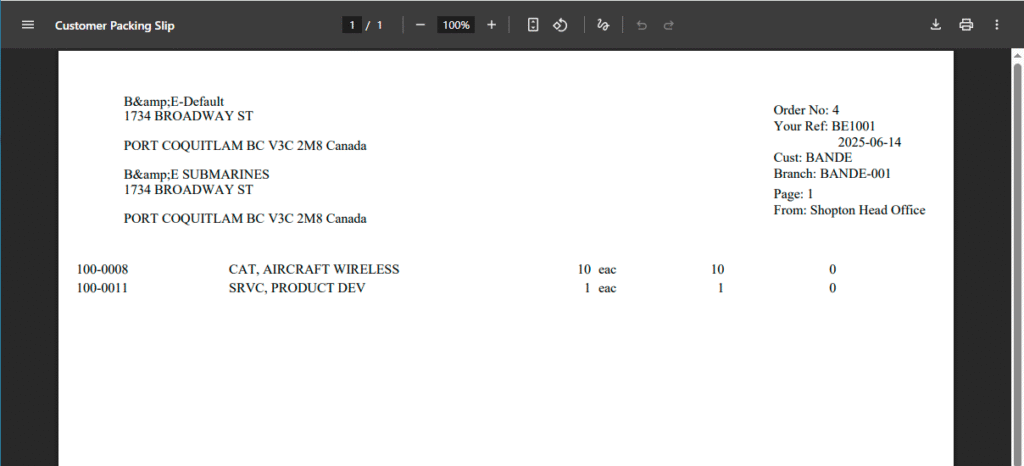
Create Dispatch Note (aka Customer Packing Slip)
A Dispatch Note is an order to ship goods to a customer, and is not a record of goods having been shipped (e.g. the dispatch note may have been lost and the goods never shipped).
TODO describe a dispatch note (aka Customer Packing Slip) and its role.
First, let’s access the Dispatch Note for the order from B&E.
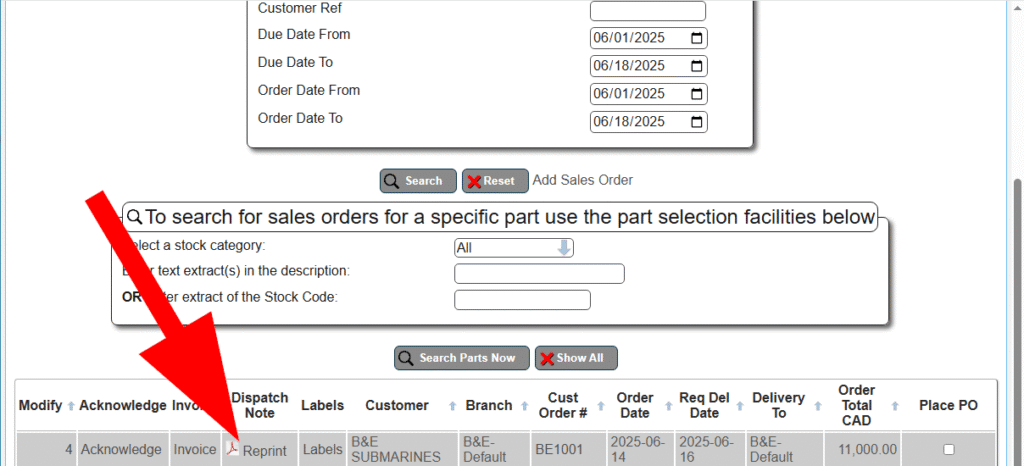
In this case, the Dispatch Note has been previously printed and webERP warns the user to ensure duplicate packing slips are not produced causing more than one shipment to be dispatched.
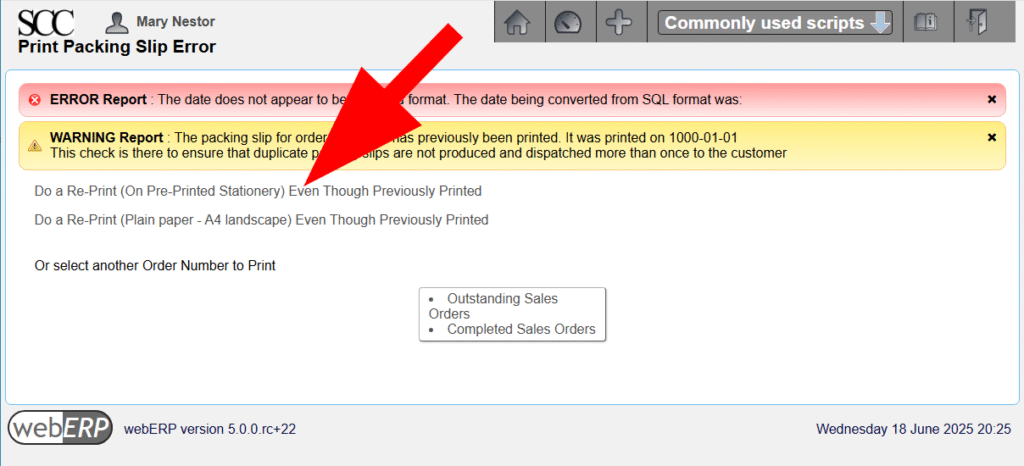
but if one is persistent, a second packing slip (dispatch note) can still be “printed” (PDF created).
Ship Order
TODO describe shipping order aka transfer custody for an item to the customer.
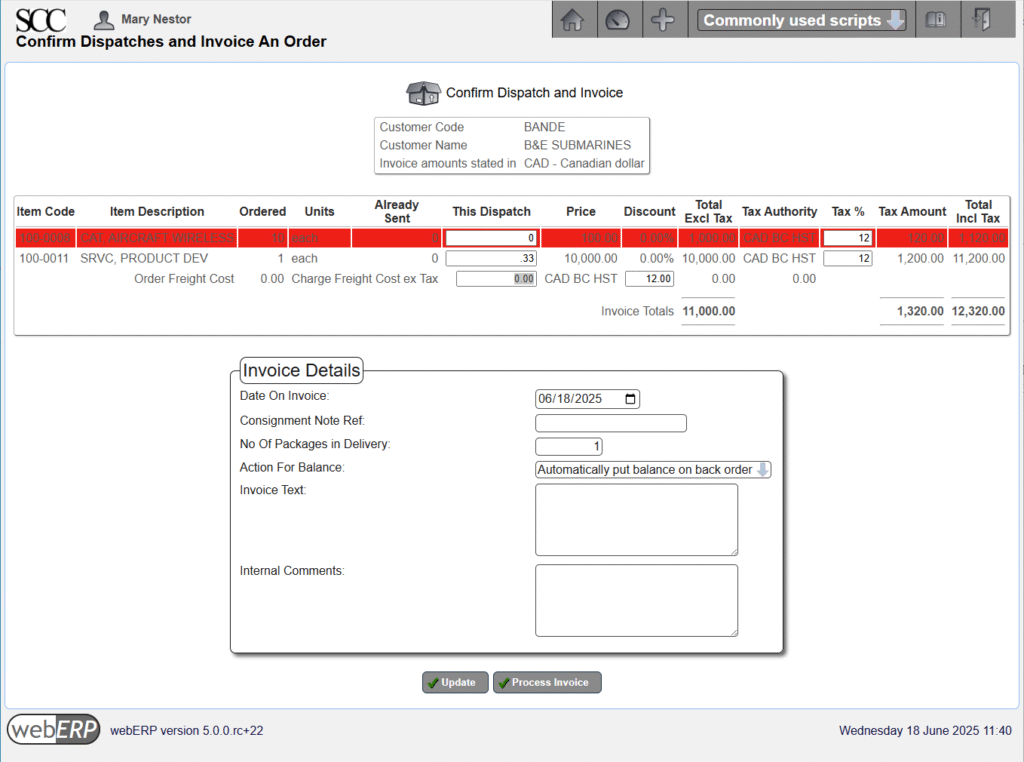
Confirm Dispatch and Invoice
Although a dispatch note (packing slip) has been created, actually shipping the goods (or providing the service) must be confirmed before the customer can be invoiced.
TODO describe dispatching and invoicing.
Receive Payment
TODO receive payment from customer.
Reports
A variety of reports are available for managing and understanding customers orders and paymentds, indicating item demand, open orders, and customers behind in payment.
Reports that you may find useful include:
- Unit Sales for a Period
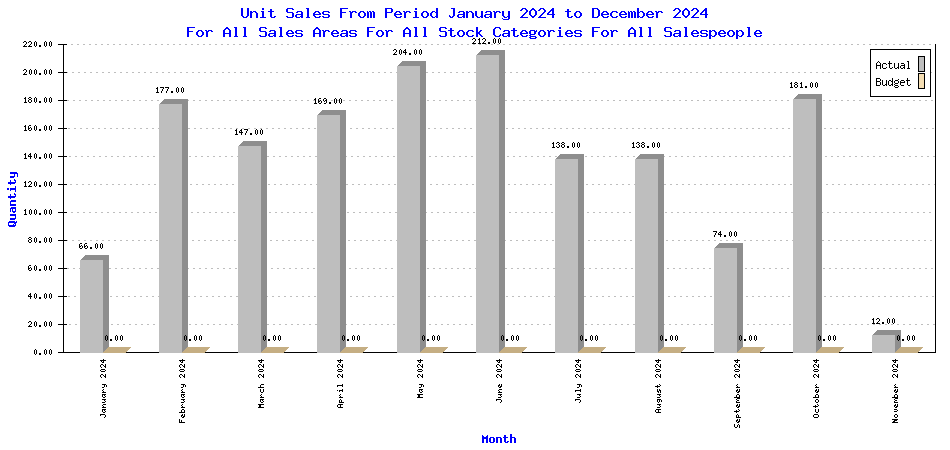
(submitted to webERP project by efeoli (Enrique) to illustrate test results 2024-11-11)
Change Happens
It happens that an order may need to be revised.
- Cancel order in whole or in part for items the customer no longer requires.
- Modify orders to mitigate reduce cost, modify delivery date, add forgotten items, substitute an item for some reason, or a multitude of other possible changes.
Summary
This completes the overview of selling with webERP. In this chapter we started by creating a product and creating initial stock we had on hand. We then created our first customer, issued a quotation to them for the product, and continued the workflow by converting the quotation to a sales order, shipping product the customer, invoicing the customer and finally accepting payment.
In the next chapter we will take a break from operational use and dive into Accounting and Finance to see how the buying, manufacturing and selling we’ve been doing is reflected in financial reports.
Chapter 6 – Accounting and Finance
Coming soon.
In this chapter, we will explore the financial state of the company after purchasing and selling done in earlier chapters.
- Review current reports and statements
- Close month.
- Review month-closing financial statements.
- Close year.
- Review year-closing financial statements.
Chapter 7 – Human Resources
Coming soon.
In this chapter, we will explore the the difference between users and employees, how to manage them, and submitting employee timesheets.
- Create and manage users.
- Create and manage employees.
- Assign permissions to users.
- Termination activities.
- Timesheet entering and reporting.
